Doing your own hair highlights at home can save hundreds of dollars per year. While going to the salon to get chunky hair highlights can easily cost in excess of $200 if you were to have your entire crown highlighted, you can get the same hair highlights chunking effect at home for under $20! Here is a DIY guide to getting salon style hair highlights chunking at home that looks great and costs less!
DIY Chunky Hair Highlights Materials:
2 Bottles Clairol Nice ‘n Easy HairPainting Highlights
Metal Free Hair Clips
Dye brush (1 inch)
Comb
Foil Wraps (aluminum foil will do fine!)
Hair Highlights Chunking Technique:
To create a chunking effect in the hair begin by separating the hair at the crown of the head and pulling it up into a clip.
Mix the Clairol Nice n’ Easy Hair Dye according to the package directions. Mix only one bottle for now so that you do not waste any in case there is not a need for a second bottle.
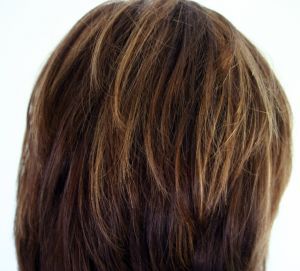
Many hair highlights begin with small portions of hair about the width of your index finger but to create chunky hair highlights you will be separating portions of hair that are about the width of your index and middle finger together.
Begin by highlighting your face by separating a portion of hair at the right side of your face around your temple. Lay a foil piece underneath the chunk of hair and use the dye brush to brush on the dye to the area of hair. Once you have covered all of the chunk of hair, wrap the foil over from left to right and then smash it together to hold. You can also roll the foil up or fold it toward the head a few times to help it stay in place for long hair. Make sure that you thoroughly cover all of the hair on the foil all the way up to the head to assure an even highlight. Do the same thing for the left side of the face with about the same chunk size of hair.
Let down a little bit of the hair that you have pulled up. Make sure that you let an even amount of both sides of hair down and then clip the remaining section back up. Depending on the thickness of you hair you will do this about 3-7 times for a full head of highlights.
Using the comb, gently separate two more chunks of hair to create some more chunky hair highlights. The chunks should be about the same size always and they should stagger around the head. Begin 1 chunk away from the face this time and with the next layer of hair that you lay down you will create a chunk right at the face. Continue following this pattern so that no matter how you lay your hair when complete the highlights will lay evenly around your head.
Once you have completed all of the underneath areas of your hair and there are chunky hair highlights throughout your hair you can begin highlighting the top of your head.
Allow your hair to naturally part when you get to the top. Using the comb, gently create a few chunky highlights for the top of the head. There should be about 8 for a really chunky look or 4 for a less chunky look. At the center of the back of your head there should also be a highlight so that the look flows all the way around the head.
To Complete Hair Highlights Chunking Technique:
To complete the chunky hair highlight look, allow the dye to remain on the hair for the recommended time frame based on the color of you hair and the color that you want the highlights to be. Remove all foil wraps and rinse hair thoroughly to reveal the chunky hair highlights.
Shampoo hair as normal and then use a high strength conditioner on you hair as well. One of my favorites for color treated hair is Loreal Vive Pro for color treated hair. It really adds the moisture back into the hair and helps the color in those chunky hair highlights last longer.