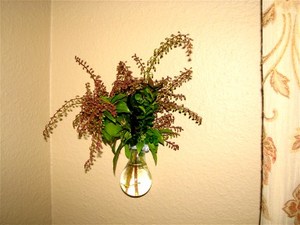
One of my favorite home decorating crafts involves hollowing an incandescent light bulb and turning it into a miniature flower vase. Not only do I get to recycle burnt light bulbs instead of throwing them away, but the small flower vases are absolutely charming.
You can decorate your home with light bulb flower vases in so many ways. In the living room, I hung them in a cascading group on the wall to create a hanging topiary. I’ve decorated my kitchen with a single light bulb flower vase stuffed with fragrant herbs that I cook with. In the bathroom I hung a cluster of light bulb flower vases on fishing wire from the ceiling, and I keep fragrant roses in them.
Really, there are endless way to decorate your home using the light bulb flower vase idea. Best of all, it’s a really easy home decorating craft, and you don’t even need special crafting materials or tools. Here are the steps I follow, and the tips I’ve learned from experience. Have fun!
#1. Which Light Bulbs to Use
This home decorating craft requires an old-fashioned incandescent light bulb because of its rounded shape, which you can hollow and turn into a flower vase. It makes no difference if the light bulb is white or clear, because you will be rinsing the color off the glass as part of the craft steps. Modern light bulbs that look like spiraled glass should be avoided. Not only are they dangerous because of their mercury content, but their shape is all wrong for decorating your home with live plants that need plenty of water.
#2. Cut the Light Bulb Top
The first step to this home decorating craft requires a little care to avoid cutting yourself accidentally. Wrap the light bulb in a kitchen towel or rag and hold it by its rounded side. With your other hand, take a knife and stick its tip into the silver edge at the top of the light bulb. If you try to stick the knife too low, you’ll hit the enforced lining of the light bulb. You’ll know you’re cutting into the light bulb in the right place when the knife goes in easily. Cut off the silver tip.
#3. Hollow Out the Light Bulb
The beauty of this home decorating craft lies in accessing the inner part of the light bulb. To that end, keep holding the light bulb wrapped in a towel to protect your left hand, and lightly shove the knife into the exposed tip of the light bulb with your other hand. I prefer to lightly bang the top of the knife with a hammer to break the filament part in the light bulb.
#4. Prepare the Inside of the Light Bulb
Take care as you turn over the light bulb over your garbage can to dump out the glass fragments and filament. Now rinse the light bulb in your sink to remove any remaining glass dust or the white paint off white light bulbs. I’ve never tried making this home decorating craft with red, green or other colored light bulbs, but I’m guessing that they too have a thin, water-based layer of paint that will just come off the moment you rinse the light bulb.
#5. Glue the Glass to the Silver Rim
I’ve recently discovered that some incandescent light bulbs will fall loose of their silver rim after you cut the inner glass section free. In the old days, this didn’t happen (but I’m starting to sound like my grandmother… so, moving on). To ensure that your home decorating craft will not turn into a hazard for pets or children (when it shatters to the floor), be sure to adhere the glass light bulb to its top-even if it seems well connected already.
I like to use a strip of duct tape which I fold half over the outer rim and half over the inner rim of the opening at the top of the light bulb. I always make sure that I’m overlapping the glass inside the light bulb. Later, the plants I place in my light bulb flower vases conceal the duct tape from sight.
#6. Create a Hanging Loop
To hang this home decorating craft, you can use craft wire to create a loop on the top of the light bulb flower vase, but I like to use foil paper. I cut a 4 inch wide strip of foil paper and fold then roll it into the shape of a cord. I then loop the cord around the rim of the light bulb flower vase and twist the end firmly in place. Then I loop the remaining cord over to the opposite side and twist that end in place as well. This creates a strong loop over my miniature flower vase.
For added strength, you can glue the hanging loop in place, but I find it simpler to place a rubber band on the rim of the flower vase just above the silver hanging band. This prevents the band from slipping off and sending my home decorating craft to a place from which no flower vase has ever returned.
#7. Fill Your Light Bulb Vases
I don’t recommend planting light bulb flower vases because you can’t drill draining holes into them. I fill the light bulb vases with water then cut branches off of shrubs for year-round home decorating displays. If I run out of herbs for my kitchen, I buy fresh one’s at the supermarket or farmer’s market and keep these in water inside my light bulb flower vases. It’s very pretty the way the stems and water show through the rounded bottom of the light bulbs.
I like to change the water in my light bulb flower vases frequently. The beauty of the clear water is half the charm of this elegant home decorating craft. Best of luck with yours!
For more of my decorating crafts, here are 5 ways to create your-own-art.


