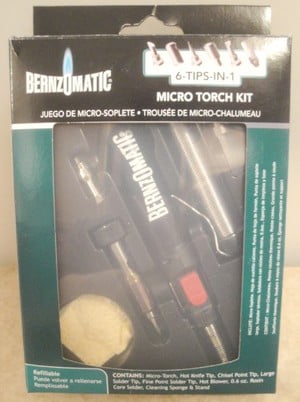
Now that you have purchased the ST250K micro torch (TorchKit Photo), you will most likely want to use it. The problem is that the instructions that come with the ST250K give very little insight as to how to use the micro torch kit.
CAUTION: The ST250K implements an open flame, which can set combustible items on fire. All the metal components and attachments of the micro torch kit get EXTREMELY HOT, and can cause fires and/or burn your skin. You should keep these cautions in mind while using your Bernzomatic micro touch.
Filling the ST250K Micro Torch
Caution: Never re-fill the ST250K micro torch in the presence of an open flame or ignition source as escaping fuel is flammable.
According to Bernzomatic’ s documentation, only Bernzomatic butane fuel should be used to fill the ST250K micro torch. Since the OEM fuel has the matching tip needed to re-fuel the torch, and the 5.5 oz. can of butane is comparably priced, using Bernzomatic butane is probably your best choice.
- Make sure the red switch is in the off position(Photo1).
- Hold the micro torch firmly in your hand with the fill-port aiming upward.
- Shake the can of butane for 5 to 10 seconds before re-fueling.
- Position the can upside-down and insert the tip into the fill-port of the micro torch(Photo2).
- Push the micro torch and the re-fueling can towards each other. According to Bernzomatic, the ST250K can be filled within ten (10) seconds. As soon as you see/hear butane escaping from the re-fueling port, stop because the micro torch is full.
The ST250K micro torch kit can be used as a micro torch when used without any of the attachments. The largest of the attachments is the Hot Blower tip. The top end of the Hot Blower Tip is internally threaded, and the knife tip, chisel point tip, and both soldering tips screw into the top end of the Hot Blower attachment (TorchTips Photo).
Lighting the ST250K Micro Torch
Look at the body of the micro torch and you will notice a Large RED switch and a small black slider-button (Photo3). The RED switch turns the ST250K on/off. The ON position allows butane gas to flow from the tip, and is activated by moving the RED switch towards the tip of the micro torch. The small black slider-button controls the amount of gas that flows to the tip of the micro torch. It is used to adjust the size of the flame, just like the slider-button on a butane lighter. You will note that there are numbers (2, 3, and 4) marked along the edge of where the small black slider-button is located. Flame adjustment is accomplished by moving the black slider-button; the higher the number, the larger the flame. When lighting the ST250K, it is best to start at the “2” setting. This is especially true when using any of the attachment tips, because higher settings will cause instability in the flame, and you will have a difficult time keeping the micro torch lit.
Lighting the Micro Torch Tip
If using the micro torch, no other attachments are needed (Torch Photo). The folks at Palmsongs Service & Repair rarely use any of the attachments, and they recommend using a Flint-Cap sparker to ignite the micro torch. However, most home and hobbyist do not have Flint-Cap sparkers. Indeed, Mary, from Mary lee Kreative Krafts used a lit tea-candle as the ignition source for lighting the Bernzomatic micro torch. In fact, internet searches revealed that many people used butane lighters, and grill lighters to ignite the ST250K micro torch.
Lighting the ST250K when using Attachment Tips
In order to use any of the other tips, the Hot Blower tip attachment must be used. The Hot blower attachment slides over the micro torch tip, and screw-locks itself on by way of a large black locking nut. Turn the black locking nut until it is tight. Just tighten until snug, there is no need to over-tighten. Note that the black locking nut is spring-loaded and slides towards the tip of the ST250K. Note also, that when the locking nut is slid forward, two (2) openings will appear below the Hot Blower Tip (Photo4). You will light the micro torch by igniting the escaping gas through either of the two (2) openings.
Now move your attention to the brass colored shaft that is exposed when you slide the Black Locking Nut toward the tip of the ST250K micro torch. Please take note of the small hole located in the brass colored shaft (Photo5). This hole is ultra-important should you decide to use the Hot Blower function of your micro torch.
- Attach the Hot Blower tip attachment, and screw-on any one of the four (4) tips.
- Set the small black slider-button on the #2 setting.
- Slide the RED switch toward the tip of the micro torch to turn the gas on. The switch makes a distinct “click” when moving into the on/off position.
Caution: When sliding the locking nut forward, make sure you do not touch any metal parts as they will quickly heat up once the gas has been ignited.
- Slide the Black Locking Nut toward the tip until the two (2) openings are fully open.
- Ignite the escaping butane gas at either one of the two (2) openings.
Hold the Black Locking nut forward for approximately 30 seconds before slowly guiding it back to its resting position. This allows time for the flame to stabilize, and to heat the metal enough to keep the flame going. Once you return the Black Locking nut back to its resting position, you will see a RED glow indicating a stable flame of the correct size, and the readiness of the ST250K for use (Photo6).
Lighting the ST250K to use the Hot Blower
- Before lighting the micro torch, slide the Black Locking nut toward the tip of the ST250K so that the small hole in the brass colored shaft is exposed (Photo5). Insert an object into the small hole. A finishing nail, or Bobby pin works great for this job (Photo7). Once the object has been inserted into the hole, release pressure on the locking nut and allow it to rest against the object (Photo8). This is an important step because the Hot Blower will not function with the Black Locking nut in its home resting position.
Important: Once you have inserted an object into the hole, ensure the hole is not completely blocked. Air flows through this hole for the Hot Blower.
- Set the small black slider-button on the #2 setting.
- Slide the RED switch forward until you hear a “click”.
- Ignite the butane gas through one of the two (2) openings below the Hot Blower Tip.
Look into the tip of the blower. You should see a RED glow under the grid located inside the hot blower tip (Photo9 & Photo10). The Hot Blower is now ready for use. The Hot Blower will emit EXTREMELY Hot air approximately 1/8″ from the opening of the tip. To increase the flow of air, increase the slider-button slightly. Remember, increasing too much will cause flame instability, and will result in the flame going out.
Because you will be working with an open flame, you should perform your work over a flame-resistant material. Mary Lee Kreative Krafts uses ceramic/porcelain tiles to protect their work benches (Photo11), but Sid, from Palmsongs Service & Repair uses fire-brick on their benches, when they use the torch at a work bench.
References:
Bernzomatic product information page, November 23, 2012, http://www.bernzomatic.com/subcat.html?id=3
Bernzomatic ST250K Instruction Document, G04002/19132, Copyright 2006
Lusbure, Mary, Mary Lee Kreative Krafts, “Using the ST250K Micro Torch”, (Demonstration, Mesa, Arizona, November 2012).
Papageorgio, Sid, Palmsongs Service & Repair, “Using the Bernzomatic ST250K Micro Torch, (Demonstration, Mesa, Arizona 2012).