As you grow in woodturning, you should expand your horizons beyond the woodturning of well formed shapes, sanded smooth and finished well.
What pleases us in a piece of Art, a fine woodturning, or even everyday objects? Shape, size, color, weight and balance, and texture add to an instinctive reaction to a woodturning we encounter: Interest.
Interest is, to me, the best term to describe one goal for woodturning and/or a piece of Art. There are grades of interest of course, from the extreme of “It’s so beautiful!”, to more quiet contemplation.
All of this is quite subjective of course, Art and design being what it is, yet I keep coming back to a common theme when I’m woodturning on the lathe: How do I create a woodturning not only “beautiful” or well formed, but with points of interest also.
Applying Texture to a woodturning, either in part or in whole, is one way to create distinct points of interest.
Texturing can be used to enhance transitions between surfaces on a woodturning, such as the boundary of a lid, the neck of a vase, or perhaps as a border to a carving. Textured surfaces often provide the opportunity for a difference in color as well.
Texturing is almost limitless in variation, but a few examples would be:
– Shallow, circular “dots” drilled just a fraction into the wood, or indented into the wood with a tool.
-Chatterwork in hard woods from a chatter-tool while spinning on the lathe.
-Randomly carved ripple patterns with a shallow carving tool.
-Scoring with a wire brush in a given pattern.
-Scoring with an electric engraver over and over to texture defined areas.
-Texturing tools that can be used on the lathe to create overall textures quickly and easily.
What do I need to create textures on my woodturning?
Be creative. Anything that can create a cut, divot, or abrasion/scoring can be used to create texture on a woodturning. Some of the more common examples are:
Chatter Tool. A chatter tool is a must for any wood turner interested in chatter-work and texturing, found at any woodturning tool supplier.
Rotary Tool or Drill. Rotary tools like the Dremel can fit a large array of bits for texturing of woodturning surfaces.
Electric Engraver. Electric Engravers are a wonderful tool to create fine-grained textures, but be prepared for a lot of hand-work. Electric engravers produce a pencil-thin line, so to completely texture a woodturning surface will require some time.
Texturing Tools. Approximately 10 years ago some woodturning tool manufacturers developed “texturing tools”. The business end of the tool has a free-spinning wheel-cutter that generates a texture against your woodturning as it is spinning on the lathe.
“Punch Tools”. Anything you can use to punch a shallow divot into your woodturning. This might be a nail with the tip rounded, or a punch tool of some kind.
Carving Tools. Whether scooping shallow flakes over and over to create a rippled surface, to using a V-gouge to create fine excised lines, carving tools allow you to create many textures on your woodturning.
Wire Brushes. Depending on the wood, some wire brushes are capable of creating a rough, or matte texture on your woodturning. Pick wire brushes with stiff metal bristles capable of doing the job.
Sand Blasting. Depending on the wood species and its grain structure, sand blasting can create pleasing textures on a woodturning as softer areas in the grain erode away faster than harder areas.
Sand Paper. As an example, you could use a rotary disk of coarse sandpaper in your hand-drill and repeat a series of ½ moon patterns in a given area on your woodturning, perhaps overlapping them like fish scales.
Texturing Note: The wood itself may dictate what kind of texturing can be used. A very hard, tight grained wood takes chatterwork very well, while a softer wood ends up a mess, as an example.
How do I color my texturing?
Note: Consider how dye or other liquid colorants might bleed through the wood of your woodturning prior to actually applying it. This is important if the textures to be colored have defined boundaries. Wood is a natural wick after all.
Ensure you know how to control the bleeding of colorants across your woodturning.
Paint. Artist paints work well. I wouldn’t use water-paints. Be prepared for careful brush work along boundaries and transitions, as well as boundary cleanup with a sharp tool or sandpaper after the paint has dried.
Dye. Alcohol or water based dyes work well. These can be found at places like Craft Supplies USA and Woodcraft Supplies. Dyes may seep through wood aggressively however, so prepare the wood carefully in boundary areas to avoid bleed-over. An advantage to dyeing is that it can’t wear off over time or be knocked or scraped off.
Consider applying your finish of choice to the non-textured portions of your woodturning first, carefully edging the finish to the texture boundary, but not beyond into the texture. This seals the wood with finish thus inhibiting the wicking of dye or thin paint beyond the boundaries of the textured surface.
Burning. Several techniques exist for burning of textured areas, with some of them being: Small torch, friction (either another piece of wood shaped as needed, or a copper wire strung between two handles held against a groove). Some turners like to “distress” a woodturning by playing a torch over selected areas to create desired effects.
Just make sure you do this safely, with flammables cleared well away, and a fire extinguisher at hand. You can also use pieces of tin-foil as small “shields” in boundary areas to keep the burn patterns where they are supposed to be.
How do I decide on a texture design for my woodturning?
There isn’t one answer to this; it is something you should develop from within as a wood turner, as an artist. Be willing to experiment, to play, to learn and develop your woodturning.
Do Internet searches on other turners, particularly those well known and accomplished, and gaze at their woodturning pieces. See how they combined shape, color, and texture to create interest in their woodturning. Some will have entire pieces textured from top to bottom, others with only portions of the woodturning textured. Some with colored or burned textures, some with polished and smooth textures.
Ask questions at your turning club meetings, see what others are doing.
It’s endlessly fascinating to me.
I can tell you what my personal feelings are and present some examples with the reasoning for my choices.
-Texturing the entire woodturning or not (interest)?
-Provide a specific point of texture simply for interest alone?
-Use a texture to create or enhance a boundary or transition to a different surface on the woodturning (interest)?
-Would color enhance the texture of the woodturning or not (interest)?
Both projects listed below are presented in photos in this article.
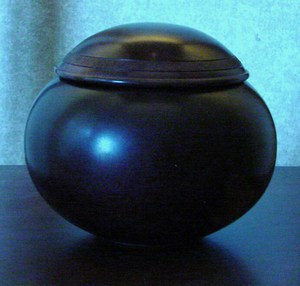
Purpleheart lidded jar
I was shooting for a shape I thought I had seen of an oriental jar somewhere.
I was very happy with the shape, particularly the proportions of the body to lid. But as I was finishing up and test fitting the lid and body, something seemed missing on the woodturning. In spite of the clean and balanced shape, the Purpleheart didn’t present wild or interesting grain patterns, just a uniform purple color with muted grain.
To generate a point of interest for the woodturning, I settled on a single thin band of texturing around the lid where it would be easily viewed.
I cut two shallow grooves defining the boundary of the textured band, using an Electric Engraver to buzz in texturing within those boundaries.
People almost always comment on the band of texturing on that woodturning, with questions as to how I did it.
Figured Norway Maple and Walnut Potpourri bowl.
In correcting an “oopsie” on the lathe (no, I never have any of those!), I was deciding how to spiff up the transition from Maple to Walnut retainer and perforated pewter lid.
I decided upon a transition surface textured and dyed black between the body of white/tan Maple and the retainer ring of Walnut. Texturing was accomplished with a “ball cutter” and a rotary tool.
In the End
Don’t be afraid to experiment with textures on your woodturnings. Some pieces look great without them, yet others are truly enhanced.
Feel free to think about the woodturning you are creating as a “piece of art”, and consider all your options!
Some links that may be of interest to you:
John Jordan (go to the Gallery link at the top of the page)
Arbortech Grinder Texturing
Making a Detailing Tool
Wood Turning Center