Members of modern day society tend to view wainscoting as a paneling of wood or composite that comes up 4 feet or so from the mop board. However, wainscoting can be so much more then that. During the Victorian times wainscoting treatments were used everywhere in the home, especially in utilitarian rooms such as kitchens, butler’s pantries, kitchen pantries and kitchens. It was applied to ceilings, full walls, bookcase backs and even cabinets!! Back then wainscoting was composed of thin strips of wood that were joined together with a tongue and groove technique and adhered onto the existing wall. This was a very time consuming and tedious task to say the least especially when you take into count that you still had to stain it and polyurethane it after adhering all those little pieces to the wall!! Today we have composite wood paneling and real wood paneling that look like real wood tongue and groove wainscoting when applied. So let’s take our queue from the Victorian’s and apply them to modern day wainscoting paneling for a fun and easy Victorian touch of elegance in any home.
Before you start there are some simple things you will need to acquire and some things you will need to know. First, you will need to purchase your choice of wainscoting. If you opt for the pre-finished composite wainscoting and your home is Victorian you will want a Cherry or Mahogany finish. If you have a beach cottage inspired home you will want to purchase either the natural or white washed finish. If you opt for the unfinished wainscoting you will need to purchase stain or paint that will compliment your décor and the architectural design of your home. I prefer the stains that have polyurethane built right in. These save a ton of time and look really great when finished. You will also need a few tubes of liquid nails, a caulking gun, long brad nails and strapping and/or molding of your choosing. You will also need a good saw for cutting your molding strapping and paneling. Now that you have everything you need let’s look at where you can place this fun decorative material.
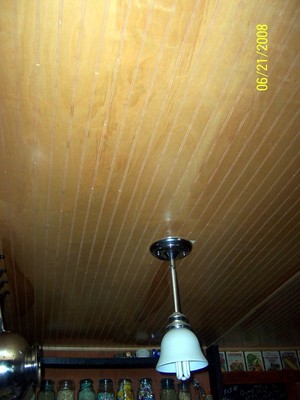
Have the most boring ceiling in town? If the ceiling has a cottage cheese or textured treatment on it then remove this first since the texturing will not allow the paneling to adhere properly, creating an unsafe hold. You can do this by soaking it with water and then scraping it off with a paint scraper or trowel. Spread a layer of liquid nails to the back of each wainscoting paneling then use brad nails to attach enough sheets of wainscoting to cover the entire ceiling. Once the ceiling is covered use either very thin strapping or trim to hide the seams. Now you have a ceiling to be proud of!! Just remember, if you are creating a true Victorian home then this application would be present only in the kitchen, laundry and pantries of the home and not in a dining area, drawing room, bedroom etc. Only apply it where I have recommended.
Now that your ceilings look amazing let’s go down to the walls. For a kitchen, laundry or pantry in a true Victorian home you can apply the wainscoting to the entire wall from top to bottom using the brad nail and liquid nail treatment I described in my paragraph on ceilings. For more formal rooms such as dining areas and living room areas you will want to come up only 4′ high with the paneling and then top it with a wide piece of fancy trim. No matter which application you choose you will want to hide your seams with very thin pieces of strapping or trim. You will also want to add a fancy mop board to the bottom where the floor meets the wall on both applications and a fancy crown molding piece where the top paneling meets the ceiling paneling on a full wall application.
You now have an amazing looking room but it is a bit bare of details so let’s move on to the things you will want to place into your room. For formal looking bookcases back them with a panel of wainscoting. You can do this on a pre-existing piece by carefully removing the manufacturer’s standard backing and replacing it with a sheet of wainscoting in a complimenting color. For custom built shelving see my article http://www.associatedcontent.com/article/824245/building_custom_shelving_units_for.html?cat=6 No matter if you are using custom built or pre-existing shelving units, you will want to attach the wainscoting to the edges of the back of the bookcase with small brad nails and, if you like, a sparse amount of liquid nails. These bookshelves do very well in a formal space such as a dining or living room but they look just as nice in a pantry or kitchen setting. For the cabinets in your kitchen you can use wainscoting on the exposed backs of the center island or the faces of regular cabinets. Just apply correct sized panels of complimenting wainscoting where wanted using small brad nails and liquid nails.
As always, if you have any questions I will be glad to assist you. Don’t forget to look at my pictures to get a better idea of the finished product. Happy paneling!!
")