They seen to be everywhere, on top water bottles, pop bottles, vitamin waters and even energy drinks, they are the plastic screw top lids. Sure you need them to keep your drink from spilling, but what can you do with them once the drink is gone? Make crafts out of them of course.
When I was a kid the lids were made of metal and had sharp edges. About the only thing you could do with them is to make a mud door mat. You took a small board and nailed the bottle caps, face up, into rows until the entire surface was covered. The mat was then placed by the door so you could run the soles of your shoes over it to remove the mud before going inside. Very functional, but not very exciting and think of all the mashed fingers from trying to nail inside all those small lids.
Now days the lids are made of plastic, some glue and maybe a hole punch are the basic tools you need to work with them now. Although you could still make a mud door mat if you wanted to, here are some ideas to get your creative juices flowing:
Make a bottle lid curtain for your window or door. Simply use a hole punch to make a hole in each side of the lid, thread yarn or twine through the holes, layering the lids or even adding a knot or two between the lids to separate them, then take the strung bottle lids and string across the top of a window or door.
You can make jewelry from the lids as well. Again, punch a hole from one side to another, string onto elastic and knot and you have a bracelet. Make a necklace by adding beads or other found objects. Turn the bottle lid into a photo frame or locket by gluing a small picture inside the lid. Add wings and you have a lady bug or bumble bee to decorate with.
My favorite is to make a plant pad for a houseplant or even to hold a bowl of candy or dish of potpourri. It is a fairly easy craft to do as long as you have basic cutting skills.
Materials:
1 Foam sheet, any color
Scrap piece of foam, any color
Scissors
Black ink pen or black permanent marker
Glue
16 or more, plastic lids caps from water and drink size bottle and/or 2 liter bottles
Pencil
Sheet of paper
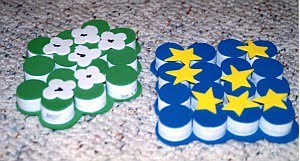
On a sheet of pattern lay out the bottle caps into any shape you want. In my example I used a square, which took 16 bottle caps and a diamond shape that took 14 caps. Play with the arrangement of caps; you can make any shape you want. Remember, a larger shape will need more bottle caps. Draw around your shape. This will be the pattern for the bottom of the plant pad. Cut the pattern out and draw around the pattern on the full foam sheet, then cut out. Using the bottle top as your pattern, draw around and cut out as many circles as you will need to cover the caps once they have been glued to the backing (cut out foam sheet).
Glue the bottle caps to the foam backing. Glue a cut out foam circle on top of each bottle cap. With the scrap piece of foam cut out some flowers or stars to decorate the plant pad with. Glue those on. One the glue has dried you can add some details, like centers to your flowers, with the black marker.
The Plant Pads make nice gifts. They can also be used under a candy dish, as a place to display knick-knacks or made smaller they would be nice as coasters.