A leather hide and or subdivision of a leather hide can provide a buyer with many uses, however before starting a leather craft project one should briefly educate themselves of what subdivision of the leather hide would be best suited for whatever particular project one is considering before creation. Educating yourself about these different subdivisions will save you allot of money later down the road and will certainly render you more desired results of said leather craft project.
The Thickness/Weight Of Leather Hide Subdivisions
Leather is almost always measured by onces. The basic formula of measuring leather can be confusing at first to some, just as I was in the beginning when I first staring out in the realm of leather crafting. I was under the impression that one would simply purchase leather by the square foot or by the yard just as fabric would be purchased. That said, it is indeed purchased by the square foot, however not before being graded first by the provider. I shall get into the grades of leather latter. Back to leather being measured in terms of onces first. Typically one ounce of leather equals 1/64th of an inch thickness. For example a weight of 7 to 8 oz. leather means the leather is about 7/64th to 8/64th of an inch thickness. Now not to muddy the waters, and or confuse you further, but each animal is different. Some would think when it comes to a cow hide, a cow is a cow but I beg to differ because leather brokers buy leather from all over the world and each region of where the cow’s origins are from they all have different ranging methods and nutritional diets and intake of different grasses or feed. You and I, as well as cows are what we eat. So in an effort to make leather an uniform thickness, when leather hides undergo the initial intake process after slaughter the wet hides are run through a splitting machine. This machines purpose does exactly as it is called and literally splits and or shaves if you will the leather hide down to one uniform gauge, and this is why leathers are usually shown with a range of thickness, such as, 2 to 3 oz., 4 to 5 oz., 6 to 7 oz., 8 to 9 oz., 10 to 11 oz., so on and so forth.
Leather Hide Subdivisions
Grain – This is the epidermis or outer layer of animal skins. The hair remains on the hide and is most commonly referred to “Hair-On-Hide” hides. Some use these untouched for wall hangings, clothing, re-enactment attire, Western and or American Indian interior design motifs.
Full Grain – Is a hide where all the hair has been removed from the hide and the grain or epidermis is left remaining. A Full Grain, vegetable tanned hide is the only type of hide that will be receptive to the absorption of water, or “casing the leather” before leather craft tooling. If the hide has not undergone any processes such as tanning regardless of method, the hide will be hard as a rock and will not emboss, be stamped and or cut in any degree without laborious effort and simply a waste of time.
Top Grain – A Top Grain leather hide is where the hide has seen some type of initial tanning process but before a full tanning process or end finish method for retail sale the leather may have been sanded as to rid the leather hide of imperfections, scars, range marks from fences and is basically a cosmetic cover-up. Again, where inching back into the subject of grading once again and promise to explain this fully at a later time.
Split Grain – Is typically the under-section of the leather hide and due to its thickness and or imperfections can be salvaged by the splitting machine mentioned above and harvest more than one hide out of one. If the leather hide is thick enough it may also render more than one hide in more than one thickness or onces, again as mentioned above. This splitting process now leads me to explain sueded leather hides below.
Suede Split – When a leather hide has been split it leaves one section, or the Top Grain of the leather hide with the epidermis intact. The remainder of the “split-hide” will be obviously left with another hide void of an epidermis, henceforth this additional split hide will be rough and will be sanded further with a coarse sanding process leaving the hide best-suited for Suede leather coats you see in retail stores. This split and rouged-up leather can only be cured and dyed only there after because the “nap” will decrease with any further tanning processes and is the main reason rainfall on a Suede coat are arch-enemies.
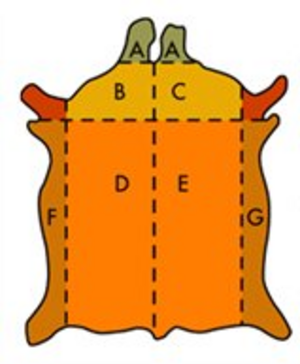
Back – The back is indeed the back but also the side of a cow hide and renders the largest yield of leather of a section of leather hide. This subdivision is best suited for belts due to its square proportions and again the largest yield. It also makes for higher-end handbags, holsters and sometimes based on thickness or onces of the leather hide smaller projects like belt bags, coin purses, clutches etc. The typical yield is around 15 to 18 sq. ft.
Belly – The Belly is the lower or underside of the leather cow hide. This subdivision is perfectly suited for lower end and smaller projects where quality is not an issue. The typical yield is around 4 to 8 sq. ft.
Kip – A Kip is a skin from a large calf and is used for smaller projects and or clothing attire. The typical yield is around 9 to 17 sq. ft.
Finally The Grading Of Leather Hide Subdivisions
Leather is usually graded from A to C, “A” being the best. Some cows, depending on how and where they ranged has an affect on the leather hide later. If the cow was clumsy for example and stumbled into a barbed wire fence it may have scars from such that cannot be sanded away as mentioned above. As I also mentioned above, leather brokers purchase leather from all over the world. That said, some cows such as the many raised here in the United States may have been branded and some of the brand may remain on the hide, however most brands are usually cut out and you can work around them after purchase. Almost all retailers of leather are very honest professionals and if you let them know what you have in mind for your project(s) they will guide you in the right direction so you can have very desirable results and the highest yield from your leather hide. I have only had one circumstance where I had to purchase a “A” graded leather section of hide, and me of course rightfully priced this project accordingly, however I have yet to find the need to purchase any other leather hides graded over a “C” due to the high quality and standards of the leather buying brokerage business and tanning processes.
HOT TIPS & TRICKS
If you do in fact purchase a leather hide, in particular a “A” graded leather hide, please keep your finger nails short and or where some type of gloves that will still allow you manipulation of your tools, cutters, etc, because a “A” graded leather hide is simply beautiful and is like room tempered butter, that said your finger nails and or any other slightly sharp or blunt object will ruin your leather with imperfections. Also allow yourself a dedicated workbench or work area when cutting what you will be using and or working on said project as to deter from marring your fine leather hide. Always keep any leather regardless of grade rolled-up and stored somewhere at an even room temperature and out of direct sunlight, for it will tan just as your own skin would tan under direct sunlight.
Sources:
Raymond J. Johnson
The Leather Factory