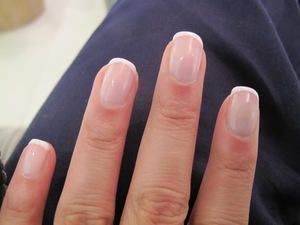
Shellac Nail Polish is the brain child of a California company called Creative Nail Design. The company says it spent five years perfecting the product.
It’s a product that is almost too good to be true. But, the cost to maintain these nails was a little bit more than what I wanted to spend. To have your nails Shellac’d usually runs between $15.00 to $20.00 above that of a regular manicure.
But, I found a way that I can do it at home for a lot less. The key to it all is that the Shellac nail polish must be set using a UV lamp. One of these lamps can cost anywhere from $35.00 all the way up to $250.00 for a commercial one.
The Shellac nail gel runs between $16.95 a bottle all the way up to $25.00 a bottle but one bottle can last you up to a dozen or so manicures. You could also purchase a Shellac nail kit they sell for anywhere between $74.00 on up to $150.00. The majority of these kits do not include the UV lamp.
The most difficult part is in removing the Shellac. Removing Shellac is a bit of a process. It first involves buffing off the first layer of color, then putting a cotton ball dipped in pure acetone on each fingernail and wrapping a piece of tin foil around it. Or if you prefer you can purchase Shellac remover wraps. It takes about 10 minutes to loosen the color. Once the 10 minutes are up, a cuticle pusher is used to gently scrape the color off completely. Nails are buffed and then ready for a new fresh coat of Shellac.
Shellac nails are the latest fashion trend and you can have them done at most nail salons but if you’d like to try and tackle it yourself, here is how to do it.
Supplies needed: Shellac base gel, Shellac polish, top coat, file and a UV (36 watt is recommended) heat lamp. (Many of these items can be purchased either online or at your local beauty supply store.)
Step 1: File nails into shape.
Step 2: Apply a layer of the base gel.
Step 3: Place finger nails under the UV lamp for approxiamently10 seconds.
Step 4: Apply a layer of the Shellac nail gel.
Step 5: Place fingernails under the UV lap for an additional 2 minutes.
Step 6: Apply a second layer of the Shellac nail gel
Step 7: And once again place fingernails under the UV lamp to cure for an additional 2 minutes.
Step 8: Apply the final top coat.
Step 9: Then place fingernails one last time under the UV lamp.
Step 10: Lastly wipe each nail with alcohol to remove sticky film.
The downfall of this all is that some consumers have reported concerns over using acetone-soaked cotton and aluminum foil. It is not a process that is recommended and improper removal can damage your nails and skin.
And, as for those worried about UV light being harmful…I looked it up and it said hands are likely to receive more UV light while in the car driving down the road then, when getting UV nail services.
My advice to those who haven’t had their nails Shellac’d, before you do it yourself, go get a Shellac manicure at the salon and watch what your nail tech does carefully each step of the way. See what you think of the results both right away and after 2 weeks. If you’re not sure you can do it yourself, don’t waste the money. But if you love it and want to take the time to do it yourself, go for it!
There you have it Shellac nails are the in thing. So what are you waiting for? Get Shellac’d!