Napkin rings might not sound like much, but when you have a special party planned; these make great additions to the décor on the table. This particular set of instructions can go for two different styles of napkin rings. One set has a very simple painted flower on it, and the other will have a much larger ‘crackle’ style painted flower on it.
The supplies below can be purchased at your local Michael’s Craft Store:
• Four wooden napkin rings. (These can be found in the unfinished wood section of the store. If you are going to do both projects, then purchase eight rings.)
• Acrylic Paints- Folk Art: Berry Wine, Rose Pink and Antique White for the first set, and Cobalt Blue, Sunny Yellow and White for the second project
• Folk Art Crackle Medium
• Four 4″ wide unfinished wood flower die cuts (see 2nd picture as reference)
• Craft paint brushes (A standard round tip brush is fine, and also a fine tip brush for detail work)
• “Satin” craft varnish (Satin is good because it has a nice, soft finish.)
• Hot glue and hot glue gun
• Paper plates
• Newspapers
• Water cup and napkins to clean brushes
Victorian Napkin Rings
Our first set of napkin rings will use the Berry Wine and Rose Pink colors. Start with the Berry Wine and squirt a little bit on a paper plate. Take your round tip brush and gently paint the entire ring; inside, too. Set aside to dry and continue with the other three. When dry, apply a second coat to guarantee the darker color. Let dry.
The Rose Pink will be used next. You will not need much of this one, so only dab a bit on the plate. After the napkin rings have dried, carefully fill in the two grooves, on the sides of the napkin ring, with a thin line of Rose Pink. Once coat should do it, but if you like, you can do two. Set aside to dry and complete the others.
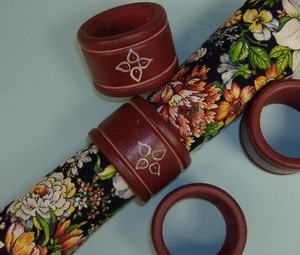
Next, take the Antique White and place a very small amount on the paper plate. This will use the fine tip brush, too. Take the brush and gently dip the tip of the brush in the Antique White paint. Carefully draw four leaf/tear drop shapes to design a flower in the middle of the ring. (See above photo for reference.) These flowers only need one coat and are supposed to look faded and delicate. Let dry.
Lastly, take out your round brush again and the satin varnish. Place a good amount of varnish on the paper plate, but be careful not to fully load the paintbrush. The varnish dries quickly and you do not want to have lumpy streaks on your new gift. One coat of varnish should be fine for this project. No need to varnish the inside, only the outside and sides of the ring will do.
Spring Daisy Napkin Rings
This next set of napkin rings will use Cobalt Blue, Sunny Yellow, White and Crackle. Start with the blue and apply it the same way as the above project. When that is dry, you will want to carefully fill in the grooves with the Sunny Yellow. While that dries, let us work on the flowers.
The first layer of paint on the flowers will be the Sunny Yellow. Using the round brush, apply a thin layer to the front side only. (The back side is the one with the barcode sticker on it. When you pull off the sticker, it leaves a sticky residue that isn’t fun to paint on.) Put aside and work on the other three. When they are dry, it is time to use the Crackle. (In another article, Crackle Painting Made Easy, I mixed up the instructions and said to put on both layers of paint and then the Crackle. I was wrong. You put the darker first, then the Crackle, then the lighter of the colors.)
The thicker the layer of Crackle, the deeper the ‘cracks’ in the paint will be. Use the round tip brush and apply a good layer of Crackle over the Sunny Yellow on the flower. Do not do the back. Put aside to dry. When all four are dry, it is time to use the White. Note: Read the directions on the Crackle you purchased. Make sure it is completely dry before applying another color of paint or you may not get the right effect.
Take your White and put a thin layer on the back of the flower first. Let it dry and then do the front. The front will take longer to dry due to the crackling. Set aside to dry. When dry, add a little circle of yellow for the middle of the flower. Let dry.
Varnish the napkin rings the same way as the above project and set aside to dry. Check on the crackle flowers. If they are dry, then very carefully brush on a light coat of Satin Varnish. Watch out and do not press hard because the crackle will come off. Take your time on this and it will be well worth it.
Heat up your glue gun. When everything is dry, it is time to glue the pieces together! Put a small dab on the napkin ring (in the same area as the flower on the Victorian ones above) and gently press the new “Daisy” in place. Set aside to dry and complete the others.
You are done. Two very simple projects that will make any Mother or Grandmother happy on their special day!
To reference my article on Crackle Painting, click here: Crackle Painting Made Easy
Sources:
Personal Experience and Ideas
Michael’s Craft Store and Michaels.com
Joanne Fabric and Craft Store and Joann.com