Photoshop Tutorial: Create a Professional Charcoal Drawing Out of Any Photo
What many people do not know is that Photoshop just is not for photographs anymore. It can also be used for creating fun, original, and unique drawings. So in this tutorial you will learn to do just that: create drawings out of photos! Specifically in this Photoshop tutorial, we will be creating charcoal drawings. Often charcoal drawings can be very abstract, even portraits, but Photoshop allows us less talented people to create a gorgeous charcoal drawing that is perfectly professional looking. A lot of other Photoshop tutorials on the web will show you how to just apply a basic filter, which is boring and can make your pictures look even more drab than you might have started with. But with this tutorial, you will also learn how to make a professional and antique looking background. This will make your new work of art perfect for printing, framing, or scrap booking. It will even be web-ready if you want to post it online.
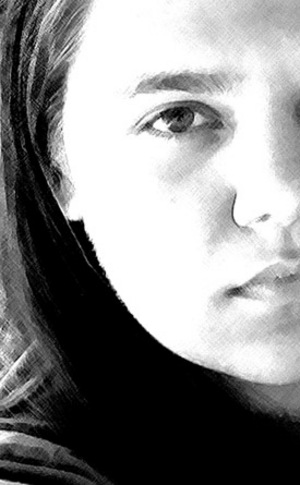
So to begin with, you will need to find an image to work with. In this tutorial, I decided to use a portrait, but you can use basically anything. Landscapes, portraits, sports scenes, macro shots, etc will all work just fine in this tutorial. If you just want to practice on a picture for the sake of learning or you can not find a suitable picture of your own to work on, you do not need to use one of your own. There are tons of free (yes, free!) stock sites that have tons of pictures for you to use. A good site to start looking is www.sxc.hu.
Once you have found a good picture to work with, you can start making it into a work of art!
Step 1) As always, open your image as its own document in Photoshop. Make sure that is 300 DPI and in PSD format.
Step 2) Now once you have your image in front of you, you will need to add a new layer. Click Shift+Ctrl+N on your keyboard. On the color drop down menu, you will need to add a color to this layer. A yellow works good with the charcoal effect, but you can choose any color you like. Make sure you name this layer so you can easily refer back to it.
Step 3) Next, go back to the image layer and copy it. Then place it as the top layer on the layer menu bar. Apply the glowing edges effect by going to Filter>Stylize>Glowing Edges Filter. A preview will be show in this new little menu. Move around the sliders until to achieve an effect that you are happy with. Every picture if different, therefore some setting will look better.
Step 4) Then, you need to “Invert” this layer by going to Image>Adjustments>Invert. You will also need to make it black and white because obviously charcoal is in black and not color!
Step 5) Right click the image layer again on the layer menu and go to Blending Mode. Change this to Multiply.
Step 6) Again, copy the background layer and desaturate it by going to Image>Adjustments>Desaturate. Place this on top of all the layers and add noise to the image by going to Filter>Noise>Add Noise>Monochromatic/Gaussian. Once you have selected the amount, set the opacity to about 80%. This will show the right amount, but not be overpowering.
Step 7) On that same layer add a layer mask by going to Layer>Layer Masks>Hide All. Change the charcoal to a large smudge or smear brush and paint on the white mask to reveal the new charcoal effect.
Step 8) Now select the layer mask a choose a full motion blur by going to Filter>Blur>Motion Blur. Then apply Filter>Brush Strokes>Cross Hatch.
Step 9) Go back to the original paper layer and will it in with a new pattern by going to New Fill Layer>Pattern. Choose any one you like and then change the blending mode to multiply or overlay. Multiply tends to work better on most images.
Then you’re done and you have a new professional looking charcoal drawing.
Some additional tips:
Crtl+Alt+Z will take you back a step if you make a mistake. You can use this hot key at any time.