Although I didn’t have any previous experience, I decided to paint our dark wood kitchen cabinets white. I should warn you that painting kitchen cabinets is not hard but it does take time and energy. I wasn’t really planning to do this myself but a so-called “experienced” painter, one with references, arrived a bit tipsy (he called it an inner ear problem but I smelled booze) and left spots on our new floor. As a result, I stopped him halfway through the job and then faced the buckets of paint for which I’d already paid.
Now what? This was Thursday afternoon and I wanted those cabinets white by Monday. So I had to get a crash course in painting…and quickly. I ran to the bookstores and the library and supplemented that with information from the internet. I want to be clear that I found this whole painting experience to be very hard work but I did save money and feel satisfied with my efforts. I would not do it again, at least not eagerly. However, it is really possible for anyone to paint kitchen cabinets. Just don’t expect it to be super quick and do follow each step.
Here’s how I did it and here is what I learned:
The first thing I learned was that I could have gotten all the information on painting kitchen cabinets by doing an internet search. Going to the library and the bookstore was really overkill. Stopping in the paint store, however, was a crucial step. I also went by the hardware store and got advice there. I was really very nervous about painting kitchen cabinets and I wasted time in overdoing the research part.
Step One: Preparation: Allow plenty of time!
Before you dip your brush in paint and apply that first stroke to your kitchen cabinets, be sure and prepare the room for painting. This is a crucial step in painting kitchen cabinets. Also, you have to be very clear about what type of cabinets you have. If your cabinets are wood or laminate and have a flat finish, this may be easier than dealing with cabinets with a glossy finish. In order to get the paint to stick, it is best to start with a surface that is sanded smooth. If the finish on your doors is laminate, talk to a specialist about special techniques and paints. We were painting wood doors so my information is for that type of painting.
You don’t have to take off all the old paint but you do need to sand the kitchen cabinet doors so that paint – and primer – will stick to the surface of the door. We used various types and grades of sandpaper, from coarse to fine, and roughed up the surface of the doors. Before this, we removed all the hardware and put all of it into one bag (an important step).
You’ll want to have several tack cloths on hand before painting kitchen cabinets. A tack cloth has a sticky surface and is great for getting rid of any remaining dust. Dust is a no-no as it will get in the paint, leave traces on the painted doors and will result in a less attractive result. We didn’t have a lot of wax build-up on our doors but I still washed them before I sanded. I had to wait for the cabinet doors to dry and then sanded them.
We primed our doors with a product called BIN, a special primer. Important tip: Be sure you get the right primer for the paint you are using. If you are going to be painting kitchen cabinets with a latex or oil paint, you have to use the proper primer. If in doubt, ask your paint store specialist or a hardware store employee who understand painting.
Also important – use the right tape to keep paint from getting on wallpaper. Ours was standard blue painter’s tape, the kind that was guaranteed to leave a smooth, even line and keep paint from going onto areas it wasn’t wanted. The easiest way to prep your kitchen is to cover anything you don’t want painted, from countertops to floors. Our entire floor was covered with painters’ cloths and we taped off the vent over our stove, etc. Trust me on this: if paint can land on anything besides your kitchen cabinets, it will!
Step Two: Decide what paint to use and whether you want latex or oil paint. Also pick a flat, medium or high gloss paint.
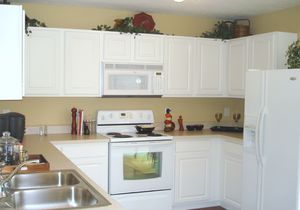
Oil paint tends to last longer but I think it takes longer to dry, don’t like the smell and it doesn’t clean up with soap and water. Latex does. Whatever paint you select, go with the highest quality you can afford. Our pick? It was latex, high gloss white paint. Why? Because the dark wood in our kitchen was absorbing light and it looked like a black hole in that kitchen. We wanted and needed to paint kitchen cabinets which we had to a nice, light color and one with lots of gloss! We got that look and it made our kitchen look so much brighter and cleaner and airier.
Step Three: Find the right brushes and get both large brushes for big areas and small or “trim” brushes for tighter spots, where kitchen cabinets meet the ceiling.
If you can use a regular brush and “cut in” or trim ceilings and edges of cabinet tops (places where cabinets meet ceilings), you might not need a trim brush. I used one, though to help paint our kitchen cabinets.
I started working from the inside out, doing the interiors of the cabinets first. Including the BIN, it took four coats of paint to get a smooth and deep finish. How long did this take? It took most of the weekend. Along the way, I discovered I might be allergic to paint because my eyes were watering like crazy! But I stuck with it, even though we had to eat takeout food the entire time. Our pots and pans were in another room.
A major advantage of painting the inside cabinets first: you can perfect your technique in an area which is less visible than the cabinet exterior.
Important tips: Work slowly and carefully. Don’t rush it and make sure you use paint that has been shaken by the paint store in a special machine or use paint which you’ve stirred at home with a paint stirrer. Also, when you take breaks it helps to wrap your brush in plastic wrap so it doesn’t dry out. Watch for drips as you paint kitchen cabinets and wipe them up immediately. Use an up and down motion and nice, even brush strokes. Go with the direction of the grain.
Final step: Allow plenty of time for the paint to dry before replacing hardware and cabinet doors (if you removed them).
You don’t have to remove the doors of your kitchen cabinets to paint them. But it might be easier if you do. However, if you remove them then you have to allow time to put them back up.
Enjoy
Resources for more information:
To see how different a kitchen can look after painting and to get some basic tips, look here:
www.hgtv.com/hgtv/rm_furniture_maintenance/article/0,,HGTV_3716_1373949,00.html
I also like this site:
www.essortment.com/home/doityourselfp_sdon.htm