Making a memory box is a great way to store cherished family memories. What you decide to keep inside your memory box is completely up to you; photographs, souvenirs, notes and receipts, are just a few things you can store in your completed memory box craft project. By following the steps listed here, you will be able to make a memory box in just a few hours.
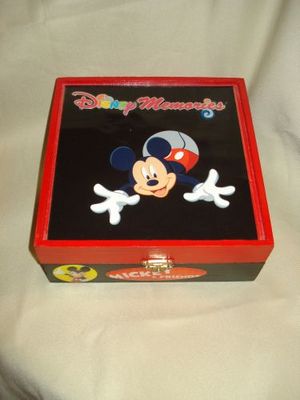
The photograph of the completed memory box depicts a completed Disney memory box craft project. When you make your own, all the embellishments and colors can be changed to suit your personal preference. We used ours as a place to store treasured memories from our Disney vacation. Your can make a memory box for any theme you want. Consider using a baby theme for a baby shower gift, an elementary school theme for storing keepsakes from your child’s youth, baking theme for storing recipes, and so on.
The supplies needed to make a memory box include:
– Unfinished wood box (Available at your local craft store)
– Two sheets of cardstock paper
– Two coordinating colors of acrylic paint
– Spray Gloss Glaze (Don’t know what this is? CLICK HERE)
– Personal photograph or large scrapbook embellishment
– Tacky craft glue
– Paint brush
– Scrapbook embellishments
How to make a memory box:
STEP 1 – Before you begin painting your memory box craft project, measure the inside of the box. These measurements will be needed to cut out two pieces of cardstock paper to line the inside of the box with. Only measure the top and bottom, as you will not be covering up the sides. (NOTE – Fabric or felt can be substituted for the cardstock paper)
STEP 2 – Look at your unfinished wood box and find a natural break. For example, in the photograph of the completed memory box, the natural break I used was the separation between the base of the box and the lid. Once you’ve located a break, begin applying paint to the outside of the box. Take care to apply the paint evenly over the entire memory box.
STEP 3 – Fortunately, acrylic paint dries quickly so you will not have to wait long to paint the inside. Once the outer paint no longer feels tacky, paint the inside of your memory box.
STEP 4 – When the box is entirely dry, glue the cardstock paper to the inside portion of the memory box. Remember, only cover the bottom and top and not the sides. Smooth out the paper after gluing to remove any air bubbles.
STEP 5 – On the outside of your memory box craft project, center a personal photograph or oversized scrapbook embellishment to the top of the box. Glue it into position. Press down firmly and wipe away any excess glue.
STEP 6 – Arrange a few scrapbook embellishments to the sides of the box. Play around with them until you find a pattern that you like and them glue them in place. (In the photograph of the completed memory box, you can see that I have used simple puffy scrapbook stickers as my embellishments)
STEP 7 – The final step in making a memory box is to coat the entire surface with a protective coating. To do this, be sure you are in a well ventilated area. Then, spray the finishing coat of spray gloss all over the surface. (Be sure to leave the lid open so you don’t gloss the lid shut) The spray gloss serves to purposes; it will protect the memory box from chipping, and will hold the embellishments in place, and it will give it a glossy finish for a professional look.
There you have it! You’ve completed your memory box craft project in just a few hours. After you see how beautiful your memory box looks when it is completely finished, you’ll understand the importance of applying the gloss glaze. It really does make a memory box look professional and gift worthy.