Did you know you could save money on sewing patterns by making them out of newspaper? With the economy the way it is and the price of gas and groceries going sky-high, wouldn’t it be wonderful to be able to save money wherever you can?
And a few of the ways you can save money is by sewing your clothes and using a sewing pattern that you make from newspaper. This is a very simple trick that my mother taught me. Some of you may already know about it, and maybe you don’t. But it’s something I occasionally do when sewing for either myself or one of the young ones in the family.
Since basic clothes patterns are the same, it doesn’t seem feasible to go buy a sewing pattern for a pair of pants, shorts, pull-over top, dress or skirt, when you can make your own. I’ve done this a lot over the years, and saved money in the process.
One summer, I made 18 outfits for 6 little girls, using this method, and the money we saved was put toward vacation. It’s fast, easy, simple and fun. This is best done with simple, non-complicated sewing patterns, with no more than six or seven pieces.
The only items you will need are a pair of scissors, a black marker, a straight edge and your newspaper. When using newspaper, you do have to been careful about the ink rubbing off onto you fabric, so use caution when cutting out your sewing pattern or use fabric colors that won’t show the ink. If any should happen to rub off on the fabric, it will come if you wash the item before wearing it.
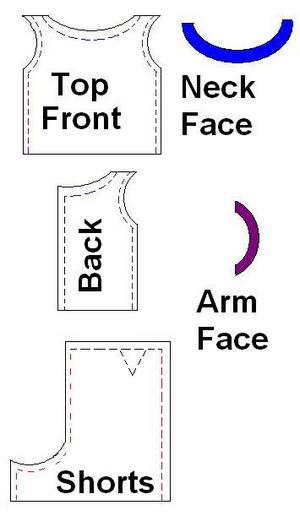
For an example, I’m going to tell you how to cut out a sewing pattern for a child’s pair shorts and a sleeveless pull-over top.
SHORTS:
1. Spread out a sheet of newspaper.
2. Take the shorts, turn them inside out and fold them in half vertically. Make sure they are even and straight.
3. Place them on a spot on the newspaper. It doesn’t matter where.
4. If you want to, you can either cut the pattern out like this, making sure to cut at least 1/2 inch from the edges, for seam allowance, or you can trace around the shorts with the marker, also 1/2 inch from the edges.
5. Now you can use your straight edge and mark your sewing line 1/2 inch around the pattern. If there are any darts on the shorts, you will want to mark these.
NOTE: Most shorts are four pieces, but you know that this one piece will make those four pieces. when you get ready to make the shorts, all you have to do is take this pattern piece. Flip it over and cut it out a second time. Now you have your two pieces for the front and the pieces for the back.
PULLOVER TOP:
1. Spread out your newspaper.
2. When cutting out the front piece of the top, I usually don’t bother folding it. I just spread the top out and cut around it in one piece. Again, 1/2 inch from the edges. Don’t forget to mark your darts and sewing lines if you need them.
3. Cutting out the back for the top is done differently. This I do fold, making sure it’s straight and even, then I either cut or trace around it 1/2 inches from the edge. You only have one pattern piece, but when you cut the fabric to make your top, you will have two pieces of fabric. One for the left side and one for the right side.
ARM-HOLE AND NECK FACING:
1. Now you want to make a pattern piece for the arm-hole facing. I just take the folded top, lay it on the newspaper, and cut out the facing by using the arm-hole of the top as a guide for curve and length. It doesn’t matter how deep it is, only how long the piece is. And don’t forget your 1/2 added to each end for seam allowance. When it comes to the deep of the arm-hole facing I make it about 3 inches. This will allow you to hem the facing by turning it 1/4 of an inch under.
You should have one piece for the arm hole facing, but this piece will be cut out twice. One for the right arm-hole and one for the left.
2. You will cut out the neck facing using the same principles as the arm-hole facing. The only difference is the pattern piece is one solid piece, remember. So, just lay the piece right on the newspaper and trace or cut, using the neckline as a guide of length and curve, plus the 1/2 inches on each end.
Make the depth of the neck facing 3 inches, which is the same as the arm-hole facing. Make sure to mark all sew lines, darts and any other areas you may need to mark.
These pattern pieces are pretty much standard and can be used for long pants, sleeved tops and dresses. When you get ready to cut out your fabric for this outfit, you should end up with:
4 pieces for the shorts – right and left front, right and left back
3 pieces for the top – the front piece and right and left back
2 pieces for the neck facing – front and back
4 pieces for the arm-hole facing – front and back right and front and back left.
For a total of 13 pieces. This method can also be used by just placing the clothing right onto the fabric and cutting out the pieces. It will depend on how adventurous you are when it comes to sewing. I’ve tried both ways, and both work just fine for me. I hope this sewing pattern method will help save money in the weeks and years to come.