Handmade invitations are an inexpensive route to take when cutting wedding or party costs. Rubber, foam, or clear plastic stamps are reusable and come in nearly endless images, words, and quotes. Stamps can be handmade from craft foam or carvable printing blocks. As long as a crafter (or non-crafter seeking a personalized touch) considers color and images before purchasing supplies, costs cans be kept to a fraction of what a printer would charge and even be kept below the cost of pre-printed invitations.
Selecting Paper and Envelopes for Handmade Invitations
Find blank precut and scored (folded) cards at craft stores and online sites. The easiest colors to find are white, ivory, and black, which can be the least expensive. For crafters who plan on printing the information onto the card, these cards usually aren’t an option for sending through a printer. On the other hand, if the invitation is informal and can be filled out by hand, look for an appropriate stamp that leaves blank lines to fill in with the who, what, when, where, why, and how of the party.
If the crafter wants to print the information onto paper and then embellish it with stamped designs, check the stationery or office supply store for 25% cotton paper, 24 pound linen or parchment paper, or textured cardstock for more formal invitations. Smooth cardstock and even regular printer paper can work for informal invitations.
If printing onto paper that will be cut to a specific size, be certain to purchase envelopes before designing the card so the card will be able to be mailed.
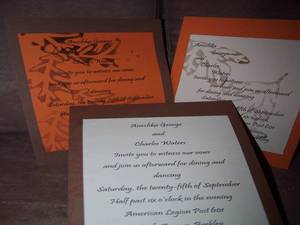
Make an Invitation with a Stamp Border
- Cut a piece of colored cardstock to fit in the envelope.
- Use a stamp to cover the paper with a single image in three colors.
- Print the information onto another piece of cardstock or paper so the paper can be trimmed down and placed on the stamped cardstock with a half-inch to an inch margin all around.
- Glue the facts for the celebration onto the stamped cardstock.
- If desired, add glitter glue or embossing powder accents to some of the stamped images.
Make a Stamped Invitation
- Cut a piece of colored cardstock to fit in the envelope.
- Print the information onto another piece of cardstock or paper so the paper can be trimmed down and placed on the colored cardstock with a half-inch to an inch margin all around.
- With a single color ink, stamp from the upper left hand corner of the information page down to the lower right hand corner. Twist the stamp to change the angle of the image. This looks particularly well with leaves falling down the page or balloons or butterflies working up the page. Make the first impression in a corner and then continue to stamp the image without re-inking so the image fades.
- Glue the accented event facts page onto the cardstock.
Special Effects with Stamping
- Create a raised stamped image that can accent part of an invitation. Print an image onto a piece of paper; cut it out, leaving a narrow border of paper around the image. Apply to the card with a foam dot with adhesive on both sides of the dot.
- Print the stamp onto a contrasting color paper. Cut out the shapes, leaving a narrow border of the paper around the image. Use a glue stick to apply one or several stamped shapes to the invitation.
- Cut a one-inch strip of paper that will wrap around the card with a couple inches of overlap. Slit both ends of the strip so it will interlock. Rubber stamp a repeating pattern on the strip or print and cut out a stamped image and glue it near (but not on) the interlocked part of the strip.
Foam, rubber, and acrylic stamps are a great way to add a personalized touch to handmade cards and envelopes. Add a little creativity to a stamp or a few, an ink pad or two, and cards or cardstock for an individualized invitation.

