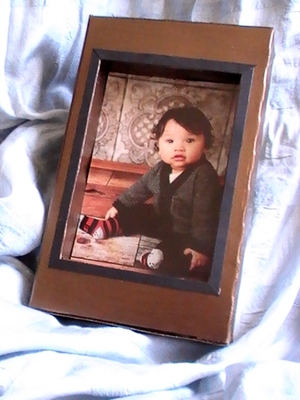
Any used container has crafty possibility. It could become the inspiration for something nifty like this shadow box frame that’s perfect for your favorite photo. I’m not one of those hoarders you see on television, but I don’t throw away anything with craft potential. When I upcycle something I would have otherwise thrown away, I feel very crafty and very green. When you finish your shadow box photo frame, you’ll know exactly what I mean.
The cranberry oatmeal cookie box I used for my shadowbox was perfect for the project. It was sturdy, constructed from a single piece of cardboard and deep enough for a genuine shadowbox look. It should be easy for you to find a similar box to use; and If you already have craft paint and glue, you won’t have to buy any craft supplies at all. It’s an easy DIY as well, doable in about 30 minutes plus paint drying time. You can put it together, and your kids will love painting it.
Tools
- Scissors, or use an Exacto or mat knife for a sharper cut.
- Craft paint brushes
Materials
- Photo
- Cardboard box
- Craft paint in your favorite color
- Glue
- A sheet of poster board. You can also use a box or other sturdy flexible paper.
Cut the opening for your photo
- Gently tear open the glued side of your box.
- Lay it flat, right side down.
- Lay out your photo: center it on one side of your box.
- When centered, my 4 X 6 photo had a 5/8 inch space at each side and a 1 & 3/8 inch at the top and bottom.
- Draw a rectangle around the picture to mark the cutting line.
- Use scissors or a utility knife to cut away the drawn rectangle
Create the inside structure.
- Cut a strip of poster board or other sturdy paper.
- The width should be the size of your box depth plus 1/2 inch.
- I cut a 3 & 1/2 inch wide strip for my 3 inch deep box.
- The length of your strip should be the total of all 4 photo sides added together plus 1 inch.
- My picture was 4 x 6, so I cut a strip 21 inches long.
- Mark and make a 1/2 inch fold the length of your strip.
- Along the folded 1/2 inch strip, mark sections the same lengths as the sides of your photo. (see illustration #3)
- My photo was 4 x 6, so I made marks at 4 inches, then 6, then, 4 then 6.
- Fold the strips width-wise at these marks.
- At each width-wise fold, cut the 1/2 inch section only from the edge to the lengthwise fold.
- Add glue to the five flaps you’ve just created.
- Glue into place around the opening with the flaps pointing away from the opening. (see illustration #3)
- Allow glue to dry.
Finish your shadowbox frame
- Close the box and glue the closure flap into place.
- Paint your shadow box. My colorful cookie box took 2 coats of paint to cover it.
- Add trim if you desire.
- Slip your photo into place.
- I used a small box to elevate my photo.
- Place your finished frame on a mantel or table.
- To hang, poke a hole in the back and place on a hook or glue a picture hanger on the back.
Once you’ve created one shadow box photo frame, you’ll want to make more. Make one larger or smaller. Make several sizes, and glue them together in a 3D shadow box arrangement. Add ribbon, charms or see “Create Wire Details to Enhance Your Favorite Craft Projects” to make decorative wire shapes.