While talking with a fellow photographer through emails, Macro was brought up. He wasn’t exactly sure how he could take Macro pictures. I told him, his camera and whatever lens he happened to have on it, and he could take a macro. After a few minutes i got a message back. He was so confused. I said, wait a minute, lets dial it back and start at the beginning.
First off, what is Macro Photography?
Well Macro Photography is simply taking up close pictures of your subject.
Well How close?
Very, very close.
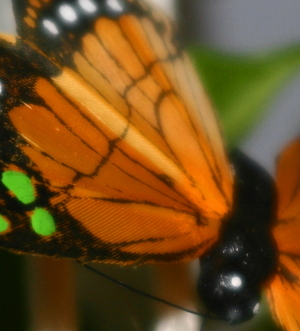
My side image is a feather butterfly. Total the thing only measures 1.5 inches from wing tip to wing tip. And to top it off, this picture is not the whole butterfly. So this in a since, would be macro photography.
Now there are several ways to take a Macro. One, get a macro lens, or two, fake it. Would you say the above picture was taken with my 300 MM on Macro settings? Set up with a tripod and set with a timer? Or would you say i faked it?
Ill tell you in a moment. First off, lets talk about what you need to take good macro shots.
First off a subject. This is so easy. Look around you. There are probably 100 things you have seen every day in the exact same way. But how many have you seen in macro? Have you looked at just the tips of the pages of a book? Or the underside of a leaf from a plant. Or children, how their little hairs grow, or even their ears which have hair on them. That is the stuff macro photography is made up. Sure the feather butterfly is really interesting. But it could be a whole lot closer.
So now you are looking at the world through different eyes. How many people stopped and looked for a subject? I stopped writing to see what was close to me. I have African violets growing on my computer desk, did you know the leaves are fuzzy? The undersides are vainy and red? Its very pretty. Anyway tangent.
The next step is to look at your gear. Well i have my trusty camera, and a regular portrait lens on it. Great for everyday pictures of my kids. Ok for macro. But what i want is my 300 mm zoom lens with macro capabilities. So i get that set up. Try and take a picture with that much zoom. Can you imagine the camera shake? You cant even tell what i aimed the camera at! Next stop, my tripod, but let me tell you, that picture wasn’t much better. Why?
With so much zoom going on, just the action of me pushing the shutter caused a great deal of camera shake. So you have two options here. Free and not so free. One, use your self timer. Make sure you set you camera to use its self timer, then back away from the tripod letting it settle while it takes the picture. The other is to go out and buy a cable release. They are pretty inexpensive, and cam be used in so many ways, so its not a bad idea to have one on hand anyway.
So now you are ready. You have your macro lens set up on your tripod. Self timer and a shutter release. Take the picture, Bam you have macro photography.
But wait. I don’t have a macro lens.
Really? So fake it?
One, you can take macro looking pictures with any lens. Granted they wont be “real macros” But hey, macro photography is just close up pictures right? So who is going to know. If you are using a point and shoot, set you camera to the macro function, its a little flower ( maybe because thats what most people take pictures of when they think macro, pretty flowers are colorful, bright and fun to photograph)
If you are using a DSLR, get out your lens and start taking pictures. Set you Aperture to as low as it can get for that lens. You want to ensure that your background becomes a big shapeless blob. You should use manual focus to get your image as sharp as you can while still keeping what you want in focus and take your picture.
Now when you open it in your graphics editing program ( try GIMP its free and just like photoshop) you aren’t going to have a all out macro. Just a close up of your subject. So the trick is to leave the image full size and crop. Crop it to just the part of the subject you want for your macro and then open it up full sized to see how it looks. Now you have a faked macro.
You can also buy rings that magnify your lenses capabilities. Meaning if you get a 2X ring. It will magnify your lens 2 times, making objects that much bigger. Not bad for a couple of bucks and it sure beats buying an expensive macro lens.
Now i lucked out, i happen to have a high powered zoom lens with macro capabilities. When set to macro, it automatically makes my depth of field much smaller, making the area where it will focus much smaller. True Macro lenses can become very expensive, so if you don’t have unlimited funds, why don’t you try out some of the other techniques i mentioned? Worth a shot right?
Oh and just so you know? that 1/2 inch of the butterfly that is photographed over there? I took that at 50mms, I was about 1 foot away from it at most, i opened it up in gimp and cropped it. So you see, even a faked macro can look great.