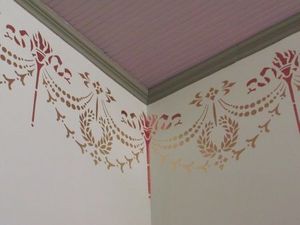
Wall stencils are an easy way to dress up any room. They can be used by themselves, as the focal point in the room, or as an accent piece with coordinating paint and décor. Learning how to stencil a wall border is very simple, and it makes a nice alternative to a wallpaper border. Wall stencils allow you the freedom to select your own colors, pattern, and you can apply it wherever you want in the room. In this article, you will learn how to stencil a wall border and find a complete buying guide for necessary supplies.
As you learn how to stencil a wall border, you can gradually increase the difficulty with the wall stencils you use throughout your home. Begin with a simple stencil that will require only one color, and then work your way up to stenciling more intricate patterns that require multiple shades.
Before you begin stenciling, make sure that you are working with a clean, dry surface. Wall stencils adhere best to flat latex paint. If you are unsure of the finish of your paint, prime the area with a paint primer before you begin to stencil. Stenciling over semi-gloss or high-gloss paint is not recommended.
Supplies needed to stencil a wall border:
– Stencil of your choice
– Spray stencil adhesive
– Pencil
– Painters tape
– Stencil brush
– Stencil paint
– Paper towels
– Carpenters level
All the supplies you will need for wall stenciling can be found at your local craft store. They are usually together in one location. When choosing your stencil brush, you will find that there are two different types available – flat tipped and domed. Either type of stencil brush will work well for beginners or advanced.
A word about stencil paint – If you are a beginner, you may be overwhelmed by the amount of stencil paints you will have to choose from. I recommend using something similar to DELTA Stencil Magic Paint Crème, which is a product that is very easy to use. Please CLICK HERE to see a sample of the stencil paint referred to.
To make your wall stenciling job easier, buy more than one of the stencil you will be using. This will eliminate the need to remove the stencil and transfer it to a new location each time. Two or three wall stencils is ideal, this way you can position more than one at a time and continue working until all of the stencils are complete.
Once you have all your wall stenciling supplies gathered together, and you’re ready to start to stencil a wall border, follow the step-by-step instructions below.
How to stencil a wall border:
STEP 1 – Position and secure the stencil
Position the stencil(s). Use a carpenters level to ensure that it is level before securing. To secure, spray the back of the stencil with spray adhesive and stick to the wall. Apply painters tape around the edges to securely hold it in place. (Always begin your wall stenciling in an indistinct place, such as above an entry doorway, or in the corner of the room)
STEP 2 – Start stenciling
The art of stenciling involves using a virtually dry brush. Too much paint will clog the brush and cause heavy blotches on the wall. Dip the stencil brush into the paint and dab the excess onto a paper towel. Dab the brush on the wall, working in small circles. Do not reapply paint to the brush until it is empty of paint. Continue this process until your wall stenciling is complete.
STEP 3 – Remove the stencil
Once you have of the wall stencils completely filled in with paint, move to the next. Again, repeat the process listed in STEP 2 until the stencil is completely filled. Once you have all the stencils painted, go back and remove the plastic stencils from the wall. Wash off the stencil spray adhesive with a damp cloth. Reapply the plastic stencil to a new location and continue wall stenciling.
Learning how to stencil a wall border is fun and the technique can be used for many other projects and ideas. Thus, after you are finished with your stenciling project, wash the plastic stencils with a mild detergent and save them for another use. These stencils can be used again for adding a personal touch to other items, or for dressing up flea market finds, as well as for arts and crafts.
** To read more from this author, CLICK HERE.
SOURCE:
Personal knowledge and experience
http://www.misterart.com/g1136/Delta-Stencil-Magic-Paint-Creme.htm


