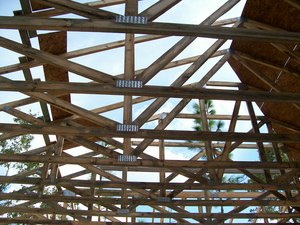
When you build a structure with a roof, sometimes you need trusses. Trusses are pre-built at a factory and designed for structural support by an engineer. Most modern houses have some form of a truss built in. Trusses can also be used for floor support in two story homes. These are called box trusses.
Most truss plants use a CAD system to design trusses for each individual house. They are then built to exact specifications for not only the load on the truss, but also the uplift a truss can withstand during strong winds or storms.
As the factory workers build the trusses they load them on a truck. Once the order is complete and the truck is fully loaded it is delivered to the site. Some companies use a roll off method to drop the trusses and some companies hand unload. If you can get a company that hand unloads when they deliver, then you’re in luck. If they get dropped sometimes they get broken or they may not be in the correct order.
Once the trusses have been dropped off at the jobsite, then its time to sort the trusses into individual piles. This is where you can tell if your truss company is good or not. If they come stacked in order you’re lucky; most don’t.
Start breaking down the stack of trusses and start setting them in individual areas around the places you plan on setting them. Take gable end trusses and set them aside. If the gable ends are small enough, you can add the plywood on them now, nail it off and cover it with felt paper or Tyvec. Just don’t make it to heavy to lift.
Set aside any hip trusses near the area you plan on setting them. Stack each offset in a pile near the hip truss. Set all of the smaller components aside for now, you won’t need them just yet.
If you have gable ends, you need to set them first. Use a few sixteen foot long 2×6’s to hold up the gable trusses. Nailing two 2×6’s together into a “T” shape will help strengthen the boards. Now use the “T” like a mast in the center of the truss. Nail it to the wall your setting the truss on. Take a long 2×6 from the top of the “T” to the ground at a 45 degree angle. Then drive a stake in the ground at the bottom of the long 2×6 and nail it in place. Do this in several spots for large gable end trusses. Repeat the process for each gable end.
Begin setting the hip trusses. I like to add an offset in the middle with a brace nailed in place. Then I set the hip in place with the offset going up and over the wall after one side has been set. Then I flip the truss and the offset sets on the wall as I lift the other end of the hip truss up on the wall. It can be made a little easier by having some one on the wall and several people lifting up the hip truss.
Now that you have set the first hip, continue by filling in the offsets and nailing them in place. Add the two king hip jacks in place on the corners of the wall. Now bring over the smaller components you set aside earlier and nail them into place.
Now you’re almost ready to set the trusses. First cut two 30 inch strips of 1×4 for each truss you plan on setting. Called lathe strips, these are going to be used to hold the trusses to each other temporarily until the plywood is in place. Using a tape measure on top of each lathe strip, make a 24 inch layout in the center of each lathe strip. Now tack two 6d common nails into each end of the strip on the layout. Hang the strips on the wall at every spot you plan on setting a truss.
Cut a v shaped notch in the top of a ten foot long 2×4. Use this to flip large trusses up. Now you’re ready to set the first common or main truss.
Carry the truss into the building with the top of the truss facing down. Slide one end of the truss up onto the wall about two feet past the bird’s mouth. (A bird’s mouth is the point on the truss where the top cord of the truss meets the bottom cord.)
Now slide the other end up on the wall. Adjust the truss until it is centered and the bird’s mouth on each end of the truss is flush with the outside of the wall.
Use the 2×4 with the v notch in the top to flip the truss up in the air. While someone holds the truss, another set of people should climb onto the truss and nail it to the previous one with the lathe strip. Make any final adjustments to the bird’s mouth at this time. Once each end is secured with a lathe strip, nail each end in place.
Now set the rest of the trusses in this manner until the end is reached. Add support boards every 10 feet. Use long 1×4’s across the top in a v shape stretching from the bird’s mouth up to the peak and back to the bird’s mouth.
You’re now ready for plywood and sub fascia.