After the handle on my bathroom faucet broke I purchased a replacement. My husband was going to change out the old faucet but never got around to it. Being the self-sufficient do-it-herselfer I am, I decided one Saturday to put in the new faucet myself. Since I had never done this myself, I wasn’t sure if replacing a bathroom faucet was an easy task or a difficult one, but I decided that I could handle it. It turned out to be an easy home improvement job that anyone can do.
Clear Everything Out of the Cabinet
The first thing to do before replacing a bathroom faucet is to clear out your bathroom cabinet. This is important because you will be stuffing a large part of your body into this cabinet in order to unhook the faucet.
Turn Off the Water Supply
Underneath your bathroom cabinet, there will be two water supply lines – one for hot water and one for cold water. These are attached to your faucet. There will be a knob on each line. Turn the water off with these knobs. This is important because if you don’t turn off the water supply, you will have a mess and your small job will turn into a big job. You don’t want that.
Unhook the Faucet from the Water Supply
This is where you will need to put the top half of your body into the cabinet. This works best on your back. You might want to put down a towel or something on the bottom of the cabinet to make it hurt less – or at least make it more comfortable for you.
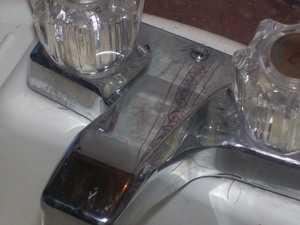
At the top of each water supply line will be a coupling that screws onto the faucet inlets. These couplings will need to be unscrewed from the threaded inlets. I found the easiest way to make this happen was to first unscrew the collars that secure the faucet inlets to the actual sink. These are plastic nuts that will screw onto the inlets and snug up against the bottom of the sink.
I was having with the supply line couplings and after much grumbling, yelling and wanting to beat on the couplings, I discovered that loosening these collars would give me the leverage I needed to loosen the couplings and unhook the supply lines.
Remove the Old Faucet
Once these water supply lines have been removed and the collars holding the faucet in place have been removed, you can pull the old faucet up and remove it.
Put the New Faucet in Place
The new faucet will come with the faucet and the new collars. Put the new faucet into place then get back into the cabinet under the sink. Screw the collars onto the new faucet’s inlets then re-attach the supply lines with the couplings.
Make sure you attach the correct lines to the correct faucet inlets. You definitely don’t want to attach the hot water line to the cold water inlet and vice versa.
Tips
You should not need any special tools to change out this faucet, but if you the collars or couplings seem to be stuck you can use a pair of pliers to help loosen them. You may use plumber’s tape on the inlets to guard against leaking but I found this to be unnecessary with my faucet as I was able to get a tight enough seal on the lines.
This is an easy home improvement project that can be accomplished quickly. It took longer for me to clear out my cabinet then put everything back into place than it did to actually change out the faucet.