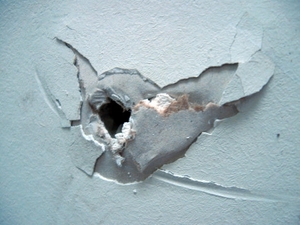
It is surprisingly simple to bump a plaster wall hard enough to cause a hole. These holes are typically found behind entry doors and closet doors, and are usually the cause of someone opening the door too forcefully and knocking the doorknob right through the wall. While the damage can look awful and may appear to be a job for a professional, you’ll find that it is not that difficult to repair a plaster hole. For a price of approximately $ 15.00, you can purchase all the supplies needed to repair a plaster hole and get the job done in just a few hours.
Everything you need to repair a plaster hole can be purchased at your local home improvement store. For your convenience, we’ve included purchase links to websites that sell the required materials.
Materials needed to repair a plaster hole:
– Metal putty knife
– Latex bonding liquid (Don’t know what this is? CLICK HERE)
– 1″ paint brush
– Patching plaster (Don’t know what this is? CLICK HERE)
– Drywall and plastering joint tape (Don’t know what this is? CLICK HERE)
– Sandpaper
How to repair a plaster hole in wall:
Before you begin…
Before you begin to repair the hole, you’ll want to remove all the excess pieces from the damaged plaster. These pieces will come off in relatively big pieces – that’s okay! Remove them and toss them in the trash. Once those are out of the way, use a metal putty knife to scrape off any textured materials from around the hole. Go around the edge of the hole with the putty knife and ensure that there are no additional loose materials. You will want to work with a relatively smooth surface that won’t crumble as you work.
STEP 1 – Wipe the area down with a dry cloth or paper towel.
STEP 2 – Using your paintbrush, liberally apply the latex bonding agent around the edges of the hole. This will prevent the hold from cracking further and create a base between the old plaster and the new.
STEP 3 – Apply patching plaster over the entire hole using a putty knife.
STEP 4 – If you only fill the hole in with patching plaster, the hole WILL reappear very quickly. Therefore, you will want to apply joint tape over the entire area of the hole beforehand. This will give the plaster a surface to hold onto, and will prevent the hole from reforming. Apply the joint tape now, making sure to cover the entire hole.
STEP 5 – Apply patching plaster again over the entire surface using your putty knife. Allow it to dry completely. The package directions will instruct you on how long this will take.
STEP 6 – Once the patching plaster is completely dry, begin sanding the area lightly. You’ll want to sand until the new plaster is of the same level as the old plaster.
STEP 7 – Paint! A textured paint will work best to conceal the repaired area.
Prevent further damage:
In order to ensure that you will not have to repair a plaster hole again, install molding at chair rail height (36″ from the floor) to protect the wall.
SOURCE:
Personal knowledge and experience


