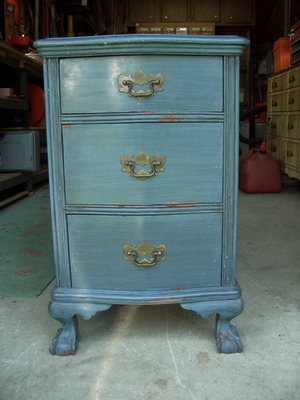
Several years ago I inherited a chest of drawers that had previously belonged to my aunt. It was antiqued blue. Antiquing is a technique used to make thrift store or roadside bargains appear old or to create interesting color effects. This technique was especially popular in the 1960’s and 70’s.
In the late 1980’s Rachel Ashwell developed a trend that she dubbed “Shabby Chic.” It is another way to make curbside finds or flea market treasures attractive and desirable by painting the pieces white. In addition to painting, appliques are often added to give the piece a romantic, Victorian appearance.
After looking at the antique blue chest in my cottage bathroom for a few years, I decided it was time for a make over. Assuming that the chest was probably a cheap piece of furniture, I thought it would be fun to make it “shabby chic.” Before rushing out to buy white paint, however, I further inspected the piece. This was a fortuitous decision as it turns out the chest is made of mahogany. The metal drawer tag inside the top drawer indicated it was made by a company called Kling. Kling manufactured furniture in the mid twentieth century and was eventually bought by Ethan Allen.
No more “shabby chic” for this chest of drawers. This elegant piece of furniture needed to be returned to its original natural mahogany. This is the step by step method I used to accomplish this task.
Step 1: Remove any hardware to be cleaned or replaced and purchase tools of the trade. These include the following:
Stripper – I’ve done a good deal of stripping in my day. It is messy, smelly and toxic and I was not anticipating the process. I was pleasantly surprised when the owner of our local hardware store recommended Citrus Stripper Gel. She told me there was no unpleasant odor, it was safe to use inside and it stayed wet for 24 hours. I didn’t even ask the price, ($14.95), bought the stripper and a natural bristle brush with which to apply it.
Other needed tools:
plastic scraper, old toothbrush or wire brush for hard to reach places, cotton swabs, #3 steel wool, 150 and 400 grit sandpaper, palm sander (optional), odorless mineral spirits and a drop cloth.
Step 2: – Brush the furniture with a coating of stripper and wait at least 30 minutes up to 24 hours. Using a plastic scraper in the direction of the wood grain remove the old finish. I applied the stripper a couple of more times where needed.
Step 3: Underneath the paint was a coat of varnish. To remove this and stubborn residue use #3 steel wool dipped in mineral spirits. This is a time consuming step especially if there are any small nooks and crannies that require special attention. My chest of drawers has claw feet and though they give character to the piece, they are a bear to refinish. For these hard-to-get-at areas I used a cotton swab dipped in mineral spirits. I also found it useful to use the stick of the swab to clean out edges.
Step 4: – To give the piece a more uniform look and to smooth any surface scratches I sanded the chest using 150 grit sandpaper and a palm sander.
Step 5: – Before applying the finishing protection coat, make sure the piece is dry and clean. You can clean it using a tack cloth or a rag dipped in mineral spirits. I used a clear gloss polyurethane spray. You can also use a brush-on finish. Whether you use gloss, semi-gloss, satin etc. is a personal choice. Apply two or more thin coats of protection, sanding lightly between coats with 400 grit sandpaper, making sure to clean surfaces after sanding. To get the shine of a glossy finish I ended up using almost three cans of spray.
Check out my before and after photos to see the finished product.
Sources:
http://klinginfo.com/identify.html
http://interiordec.about.com/od/cottagestyle/a/a_shabchicstyle.htm
http://tlc.howstuffworks.com/home/guide-to-decorating-wooden-furniture-ga1.htm