Recaulking a bathtub can be an easy way to remove built-up mold or mildew around the surface of your tub. It is also essential to recaulk your bathtub if caulk shows signs of wear; water can work its way underneath the cracks between a tub surround and bathtub, causing the surface underneath to degenerate over time. Although the mechanics of recaulking a tub are fairly simple, it is important to work carefully in order to achieve professional results.
Step 1: Remove the Old Caulk
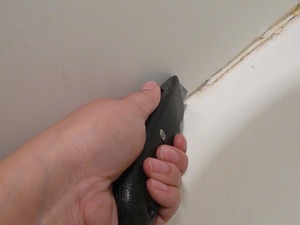
Using a utility knife, remove the old caulk around the tub surround and bathtub. Often a long string of caulk can be pulled away from the surface of the tub surround with very little effort. Continue removing the existing caulk until the seam between the bathtub and the tub surround is fully exposed.
If you have difficulty with this step, you can purchase a silicone caulk remover at any home improvement store. However, it is highly unlikely that you will need it to remove the existing caulk on the bathtub. If you have large amounts of caulk to remove, you can also invest in a tool specially designed to remove caulk, but a utility knife is usually adequate for this type of project.
Step 2: Clean Your Surfaces
Clean the surface of the bathtub and tub surround using rubbing alcohol to fully remove any mold, mildew or dirt. Be sure to clean the seam between the two thoroughly, ensuring there is no hidden debris that could interfere with the caulk’s ability to seal to the tub.
Step 3: Apply the Caulk
Apply a bead of caulk over the newly cleaned seams using a caulking gun. Be sure to choose kitchen and bathroom 100-percent silicone caulk to recaulk your bathtub. White caulk is preferred for a white bathtub. For a colored tub surround or bathtub, use clear caulk, or a caulk that you’ve tested and are certain will coordinate with the other colors of the bathtub and surround.
When working with caulk, be sure to cut the tip of the tube of caulk at a 45-degree angle. For this project, a 1/4-inch bead of caulk was used. You can adjust the width of the caulk to accommodate a larger crack between the bathtub and tub surround by cutting a slightly larger opening at the end of the tube of caulk.
Step 4: Smooth the Caulk
Use your finger to shape the bead of caulk into a slightly concave shape. Stop often to remove the excess caulk from your finger. Keep in mind that you should try to avoid removing too much caulk when completing this step; it is important to have enough caulk to create a seal between the two surfaces.
If you prefer, caulk-smoothing tools are available to help you complete this step. These tools will help you finish the caulk at a perfect 45-degree slant. However many professionals prefer the slightly concave caulk lines, and they contend that great results can be achieved with your finger and a bit of patience.
Step 5: Complete & Cure
Use a damp cloth to smooth where the edges of the caulk meet the bathtub and the tub surround. Remove any imperfections in the caulk during this step to achieve professional results. Allow the caulk to cure for at least 24 hours before using the bathtub.


