Have you ever seen a poster with words that were obviously hand-lettered, and thought to your self, “Gee, that’s just gorgeous, I wish I could do that, but it probably takes talent that I don’t possess “?
I should be the last person to be teaching people how, but I have in fact taught children as young as seven how to form beautiful letters as easily as if they were writing normally. Unlike many people who take up calligraphy because their handwriting had already been incredibly stunning to begin with, my own handwriting was (and I think still is!) kind of ugly. I was six years old by the time I learned to write by myself, and have since always been know to have messy, chicken-scratch penmanship. Many years later, I taught myself calligraphy in my spare time, just a few minutes a day. Eventually my friends would notice, and ask me to do greeting cards, invitations or custom certificates, and would pay me nicely for practicing this satisfying hobby.
You do not need to be an artistically talented person to be a calligrapher. But you will frequently be mistaken for one.
To begin practice, you will need a few materials:
1) Regular paper (copier will do nicely)
2) Tracing Paper
3) Lined paper (optional)
4) Ruler
5) T-square or any triangle ruler
6) Calligraphy marker ( preferrably Elegant Writer, small or medium tip)
Most of these things are available from any office supply store, maybe even at your own office desk.
I recommend the calligraphy marker because it is very inexpensive (at the time of writing, they cost from $2 to $3 each). So your total cost could be as low as $2, and nothing if you borrow the marker.
The reason I don’t recommend a calligraphy kit, which is a book complete with pens, nibs, ink barrels, paper, etc., is that they obviously cost more (my neighborhood art store prices them at $15 and upwards) and you are expected to fuss about with the mechanical upkeep of the pen as well. I feel this detracts from directly getting your hands involved in learning the essential skills needed, and instead keeps you mentally occupied in the wrong places. I believe in making extraordinary things out of simple materials and equipment, because the art ultimately comes from you and not completely from a fancy pen. Besides, you can always get a nicer pen when you get more proficient.
WARNING! Do not proceed if you are (1) left-handed (2) and are unwilling to use your right hand. Almost all calligraphy pens are for right-handed people, and writing southpaw may be a bit of a problem if you are one of those left-handers who end up smearing your wrist with ink as you write in your notebook. You might be able to locate left-handed pens on e-bay, and when you buy it you’ll still have to cock your wrist, or hook it over the line you are writing on. My left-handed students simply transfer the marker to their right hand, and begin writing. They say it’s actually easier than it sounds.
Now place a piece of paper in front of you (I like to put my paper on a clipboard to secure it, and put the whole thing on the table).
The Grip
Hold the calligraphy marker just as you would a regular pen, held comfortably in between the thumb and first two fingers. In relation to the paper, the pen itself should be at a forty-five degree angle, or close to it, just to make the handling more comfortable. Some students also like to anchor the pinky finger, straight and flat on the paper. This is a great idea as it gives you a very stable base to work with as you write.
The Mark
I call this exercise the Dab. Keeping your wrist resting on the paper, lift the tip of the pen, and then touch it to the paper. Use the entire tip of the pen like a stamp, not just touch a corner of it. Because the pen has a squared chisel tip, you will notice it makes a diagonal mark on the paper. Lift the tip again, move your wrist sightly to the right, and make another dab. Do this five or six times as a warm-up.
The Angle
The diagonal slash-marks may or may not have turned out parallel in the previous exercise. Now it’s time to get the correct angle. The magic number for most styles is 45 degrees. The pen is held in the hands to consistently make 45-degree dabs on the paper. To train yourself, you can use the triangle ruler to make 45-degree guidelines. Or simply draw a 1-inch by 1-inch square, and with a pencil, connect the lower-left corner to the upper right corner. Presto! Instant 45-degree guideline. Train your hand to keep this angle constantly, which simply means to keep the pen from twisting in your hand. You can practice by filling out about 1 line of 45-degree dabs. Rest when you are tired.
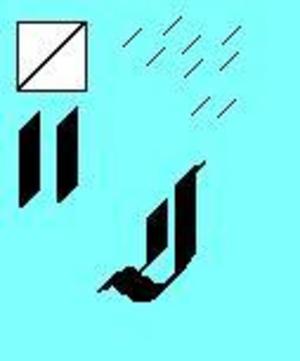
The Line
I promise this will start looking like calligraphy soon. Now make a dab (of the correct angle) on the paper, but do not lift the tip yet. Instead, move your wrist (and pen) down, pulling the pen into a perfectly straight line (or as straight as you can manage). Move your hand away, relax, and look closely at the line you just made. It should resemble a parallelogram, or a kind of tall rectangle with the right side higher than the left. This is a basic building block for almost all the letters in the Gothic calligraphy style you would see on diplomas or even tattoos. It is also found in most of the letters in the Italic style. Almost all the letters in western calligraphy are built with a combination or variation of this block, and different-length dabs.
For an exercise, use some lined paper and make two to three rows of these blocks, making sure they are parallel to each other. Then do another row, but with the blocks twice as tall. Try to see how neatly you can make them.
The essential thing to remember is that calligraphy letters are formed by pulling, not pushing, the pen. Not only will pushing damage the pen, but the letters will come out quite badly, not to mention that you will break the relaxed, natural rhythm that helps form the graceful, beautiful letters we are going for. Pulling is almost always done downwards, and generally to the right. Some students find it helps by thinking of painting the letters, instead of writing them.
The Letters
While I cannot illustrate the actual letters here, I can suggest purchasing a book by Ken Brown, Margaret Shepherd, or one of the Speedball guides, if you cannot find them in your local library. There might even be sample alphabets in a sheet that come with the pens you bought.
These books supply practice sheets and lined paper guides, but to keep them new I like to lay tracing paper on the actual letters and practice writing on the tracing paper. In my own start, I would learn some three to five letters a day (it would take me some twenty to thirty minutes), and practice the entire alphabet, upper and lower case once a week.
The styles (or fonts, as most people call them nowadays) that I recommend practicing are Gothic, Italic and Uncials. Not only do these major styles (and their varieties) employ the same angle and technique (not to mention the kind of pen) as the ones in your basic practice, these are also the styles widely recognized by people as “calligraphy”. Before you know it, you will be known among your friends as “the one with the nice handwriting”, while your “real” handwriting can remain a secret to them!
I will put some Amazon links to the authors I mentioned, so that they might help guide you into exploring other avenues of this great hobby. Keep practicing every day, and may you always be a source of beautiful words.
")