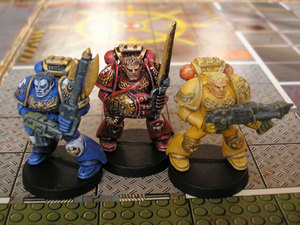
If you are new to Warhammer 40k and want to know the best ways to paint your models, apply details so that they look crisp and neat, how to make your Warhammer 40k army look unique, and how to model the miniatures, you’ve come to the right place.
Gather Your Supplies
All you need is a good, diverse selection of paints, some inks to wash and apply details, and a few quality brushes (preferably 3 to 5; two to three for fine detailing, one for basecoating, one for highlighting, and one that is old and stiff for dry brushing). These can all be bought at either a hobby store or directly from the Games Workshop Website. The Games Workshop website also offers a selection of over 50 different colors to choose from. Other things like a mixing palette and water and paper towels are also handy to have. A magnifying glass that can hold the model as well is a huge plus if you are trying to paint tiny, fine details like eyes and medals.
Before You Start
Lay out all of your painting supplies and models in front of you. Create an area where you can work that has adequate space for you to mix paints and to hold the model and paint with plenty of room. Lay out newspapers so that your work area will be protected from paint or water spills.
Before you can start painting your Warhammer 40k models, you must first assemble them and make sure that the glue has fully dried. Then you must apply the primer.
Primer
The two most popular primer colors are black and white. If you want to paint bright colors onto your models, then you should use white. If you want to paint dark colors onto your models, then you should use black. I would advise doing this outside so that you do not breathe in any of the primer particles when you spray. Place all of the models you want to prime on a big cardboard sheet. Hold the primer spray at least eight inches from your face. Spray and move in a side to side motion. When that side is covered, rotate the sheet 90° and spray again. Do this until your models are completely sprayed and every little crevice is painted. Let the models dry for approximately 30 minutes to 1 hour.
Preparing Your Paints
Shake your paint bottles. Most likely the paint has been sitting in the bottle for a long time and has become mushy and will need some good ole elbow grease to loosen up. Shaking the bottle loosens the paint from inside the bottle and will make a more fluid like and easier to use substance.
Thin your paints. Thinning your paints is essential to the process. If you do not thin your paints, the paint will be too thick and it will cover up all of the areas you will need to detail paint later. In order to do this, for every drop of paint you pour into your palette (if you don’t have a palette you can use a piece of cardboard or plastic cups) you will add a certain part water.
For base coating you will want to use one part paint, one part water. For thin coatings and airbrushing and outlining, you will want to use one part paint to either two or three parts water depending upon the thickness of your paint. For highlighting and shading you will want to use one part paint and either four to six parts water. These values are not absolute. If you think your paint is too thin or too thick, take the appropriate measure to ensure that it is the way you want it. With practice and experience you will be able to learn how much of each is necessary.
How do I start?
First, paint any of the flat parts of the model with simple, flat colors. If you want, you can apply a single color for the basecoat. Try to aim for a smooth, neat finish that is not too thick. You don’t want to obscure any of the details. Avoid making streaks by applying either two or three thin coats to get a solid finish.
Highlighting
Highlighting can be tricky if you are not patient. Highlighting consist of applying a very thin line on the hard edges of the models. Armor, weapons, shields, and other accessories are the best for highlighting. Keep in mind the direction of the light in relation to the model. If you want to paint the light as being directly above the model, the highlight lines should be on top of anything you highlight, not under.
Dry Brushing
Drybrushing is a quick way of adding highlights and fine textures to your models. Prime candidates for dry brushing include armor, weapons, shields and other accessories. An old brush works best as they are rough, firm, and dry. Mix a lighter shade of the basecoat. The paint should be thick. Don’t worry; you are going to remove most of it anyway. Using either a towel or tissue paper, wipe away 90% to 95% of the paint present on the brush. This is so that when you apply the paint to the model, you will only apply a light finish that gives the model a more natural look.
Lightly move the brush back and forth over the area you want to drybrush. Imagine that you are dusting off a trophy. Just little, dainty flicks of the wrist will be able to do the trick. The drier the brush, the better your results will be. The more time you run the brush over the area you want to pain the deeper the affect will be. The brush should not leave any noticeable strokes or smudges. Go back and cover them up if they are present. If not, move on.
Layering
Layering will help you produce the best looking models possible. However it will take much longer for you to finish painting your models because you will have to let each one completely dry before adding each layer. Start with a dark color, such as a black primer. Let it dry. Then add a dark base color. Let it dry. On top of that add a lighter version of the base color. Continue to do this until you reach the desired color for your model. The secret is to leave little traces of the original dark base color in crevasses and recesses, such as under the knees, shoulders, under weapons, under feet, etc. This will help to give your model natural shading and will give your model a sense of depth when viewed from a distance.
Ink Washes
Ink washes consist of applying an ink over a thin, light base color. This is so that the ink can run down the model and into the cracks and creases. This will give your model a stained, or more realistic, look. Ink washes can be really tricky because washes are very hard to judge. The model might look great when wet, but when it dries it might look cracked or present a diminished brightness. The only way to get ink washes the way you want them is with practice and experience. If you think that an ink wash is not going the way you prefer, dry the model off with a towel and start again.
Modeling Details
There are several things you can do to make your model look more realistic.
Bases
Take glue and apply it to the base of the model. Dip your model in sand or flock. Make sure to brush away any access sand before continuing. Next take small pebbles or rocks and place them in positions that would enhance the model, but not get in the way of the miniature. (If you want you can paint a tiny pebble a light tan color and dot it with black to make it look like a skull. Place this under your model’s foot for a specialized detail.) Next buy some static grass from a hobby store. Smoosh them together, prop them up, and glue them to the base to look like bushes or shrubs.
Bullet holes
You can make bullet holes by drilling partially into the armor of the miniature. The desired effect is for it to look like bullet impact. Then use a knife and gently rotate around the drilled hole. This will give it a more realistic look.
You are almost done!
Now you have to protect all of your hard work by applying a varnish or enamel. This will allow it to stay safe from air damage and will protect the paint from fading over time or from chipping during play.
Experiment
The best way to learn is by doing. Don’t be afraid to apply unorthodox colors to models. They will help make your models look unique. The more you paint miniatures, the better you will become. Once you are more familiar with the basics you can try out more advanced techniques. Plus, it’s a good excuse to collect more than one army as different armies will require different styles and techniques to make them look authentic.
Good luck!


