Origami is fun to fold to adorn presents and packages, but you can also use it to make jewelry. Naturally, that takes smaller sized origami. Making tiny origami is a bit more difficult than origami using 6-inch or even 3-inch paper. The result is not only beautiful, but also awe-inspiring. People will wonder how you made that crane so small. Use the tiny origami cranes to make jewelry and other decorations.
Choosing an Origami Design
You can’t just choose any origami design and make it tiny. Many are too intricate and have too many folds. Instead, choose an easy to intermediate design. If this if your first time folding origami, start with a larger square of paper until you can fold the design by heart. Then go smaller. Some examples include the crane, as used here, butterfly, heart, and fish. There are many books and websites with tons of origami designs to choose. One of the best is the Origami Resource Center.
What You Need to Fold a Tiny Origami Crane or Other Design
My idea of tiny is a crane smaller than the diameter of a dime, as seen in the photo above. This might be too small for a beginner, but you want a crane small enough to surprise people, but big enough to make into jewelry. Take a 6-inch square of origami paper and fold and cut it into four smaller squares. Take one of those squares, fold, and cut it into four even smaller squares. The resulting squares are a good size for beginners and for jewelry. Fold one of those squares into four tiny squares when you really want to surprise people.
Besides itty-bitty paper, you need tweezers and a hard surface.
How to Fold Such Tiny Origami Cranes
Keep the square on the hard surface while you work. Use just the tips of your finger to fold the paper, and use the tweezers to press the paper down. Run the tip of the tweezers along the crease to help strengthen it. Sometimes, you might need to use the tweezers to make the required fold. To do this, run the tip of the tweezers along the paper where you want the fold to make a pre-crease. Grasp the edge of the paper and fold it along that pre-crease you made. This technique is the same for any tiny origami design you choose to make.
For the crane, I prefer the traditional design where the body opens like a balloon. It not only looks beautiful, but the open body is perfect for making jewelry. For a good visual how-to, go to Bridget Spitznagel’s Carnegie Mellon website. Fold the crane up to Step 12. After that, do an inside reverse fold on the left and right lower “legs.” They will point to the left and right while at an angle. Do an inside reverse fold on one of the folded legs and near the tip to create the head. Don’t know what an inside reverse fold is? Check out the tutorial at Origami Instructions. Finally, pull gently on the wings to open the body.
How to Make Jewelry with Your Tiny Origami
The first thing you must do is strengthen the paper so the jewelry will last. Paint a thin layer of Mod Podge glue over the entire origami design. You’re going to need a tiny paintbrush so you don’t have giant clumps of glue on the paper. Let the painted origami dry completely.
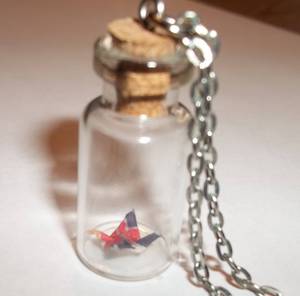
Now, use your imagination. Want to make earrings or a necklace? Curl the end of some metal wire to make a loop. Stab the other end of the wire through the center of the crane, or other origami, and make a second loop at that end. You can now add a chain or fishhook earwires for earrings. Make the itty-bittiest origami and place them inside tiny glass bottles. Turn the bottles into necklaces.
Besides jewelry, you can glue the tiny origami cranes to gemstones, fake flowers, or bookmarks. They create a 3D effect and recipients love the tiny artwork.