Making homemade crayons is a great way to not only reuse all of those small crayon pieces laying around, but a fun way to make your own crayons in unique shapes and colors. Some crayon recipes call for melting crayons down and pouring the wax into crayon molds, but this is unnecessary and dangerous. Also, muffin tins and candy molds are hard, making it more difficult to pop the crayons out once they’ve cooled. Commercial kits are also for sale to make homemade crayons, but there’s no need to buy one. Instead, this crayon recipe gives you easy, homemade crayons in just three simple steps using silicone molds.
Silicone is a newer product found in many kitchen items like bakeware. It’s flexible, dishwasher and freezer safe, and oven safe up to about 500°F. For this recipe, any silicone products with smaller compartments work well, such as mini muffin and cupcake molds and ice cube trays. The best thing about making homemade crayons with silicone crayon molds is that you can invert the mold completely after the crayons have cooled, so they pop out easily without cracking your new crayons. There are lots of designs to choose from, but here are a few to get you started:
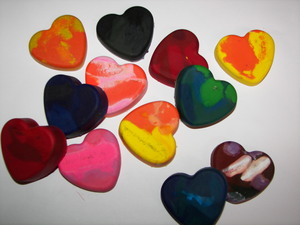
Wilton Silicone Bakeware–try their bite sized brownie squares, mini muffin pan, petite trees, or petite hearts (shown in the pictures for this article). Many of these can be found at your local Target.
10 Creative Ice Cube Trays–cool shapes like Legos, skulls and crossbones, gemstones, and Space Invaders characters make really fun crayons to keep or give as gifts.
Tovolo Red Silicone Perfect Cube Ice Tray Set–this set of 2 trays makes perfect cubes. Fill them half full for chunky square crayons that are easy for little fingers to grip.
Homemade Crayon Recipe You Will Need:
1 silicone mold
Small pieces of crayons without the wrappers
1. Preheat the oven to 400°F.
2. Place your silicone mold on a baking sheet to keep it steady. If you are worried about spilling, place a piece of parchment paper on the baking sheet under the mold for easy cleanup.
3. Break up the crayon pieces so that they fit into the mold. You can put like colors together or mix and match. Different colors that melt together produce a fun swirled effect.
4. Place the tray in the oven for 5-10 minutes until the crayon pieces are completely melted.
5. Remove the tray from the oven, place on a cooling rack, and let the crayons cool completely. When they are completely cooled, pop the crayons out of the mold one at a time, inverting each shape so that they don’t crack or break.
My kids love to mix colors, since they swirl together, giving you different colors across the page as you use them. Some favorite color combinations are (in whatever shades you have):
Red-pink-purple
Yellow-Orange
Green-Blue
Blue-Purple
One of the best crayons I made had 2 shades of purple and one piece of a copper Crayola crayon. The copper melted into sparkly speckles and was really fun to color with! So be creative and have fun.