What IS a cupcake cake?
You’ve seen them before… the cupcakes that are ‘somehow’ arranged and decorated like cakes!
Some people call them pull away cakes, cupcake cakes... whatever… they’re all the same thing ~ an arrangement of cupcakes that makes it easy and fun for everyone.
Think about this ~ no mess, no clean up… no need for paper plates, forks, and all that! Simply grab a cupcake and ENJOY!
No longer do you have to miss out on a greatly decorated cake, just because you prefer cupcakes! You can have it both ways!
In this article, you’ll learn how with step by step directions. As an added bonus, I’ll explain how to make cupcake cakes by two different methods!
Directions for easy cupcake cake making:
I’m going to outline step by step directions for the easiest way to make cupcake cakes.
Make icing prior to starting, or you can purchase canned icing, though canned icing may be difficult to decorate with, it all depends on what you’re doing.
If you’re going to be doing shapes and decorations, you will probably want to use a homemade butter cream icing recipe. If you don’t have one, simply go online and do a search for butter cream icing recipes, there’s a zillion out there. (sorry I’m not sharing my recipe, it’s a ‘secret’)
You can also use whipped cream icing as well, but again if you’re doing massive decorations you may want to use a stabilized whipped cream icing so it retains the shape.
You can also use fondant for accents, accessories, decorations on the cake. It is not advised to use on entire cupcake cake, because it’ll be difficult to pull apart the individual cupcakes.
Step one: Prepare your cupcake cake trays. It’s best to use the double lined cupcake liners for added support.
S tep two: Prepare your cake batter or if you want to ‘cheat’ use a boxed mix.
Step three: Fill your cupcake liners almost to the top with cake batter.
Step four: Bake cupcakes until done.
Step five: Remove cupcakes from oven and cool on wire rack.
S tep six: Prepare a cake board to arrange cupcakes on. This can be a cake board you purchase from local store (Michael’s carries them, as do cake supply stores, or anywhere you find Wilton products), or you can use plywood, or anything that is sturdy.
Step seven: Arrange the cupcakes on the cake board (do NOT use icing at this point). You are simply placing the cupcakes on the board in the shape you want the finished cake to be in. You will want to arrange them so they’re as close as possible to each other (a staggered arrangement works best).
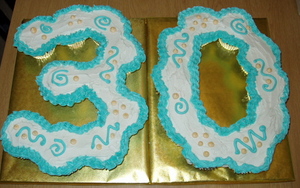
You can arrange cupcakes in a variety of shapes, you don’t have to stick to the ‘normal’ rectangle, square or circle. Get creative, place them in shapes, numbers, butterflies. The options are only limited by your imagination!
Step eight: Lift up each cupcake, placing a small dab of icing on the bottom of the cupcake liner, and return to where it was originally placed on the cake board. The icing acts as ‘glue’ to keep the cupcakes in place. Continue to do this for all the cupcakes.
Step nine: Begin to put the base coat of icing on the top of the cupcakes. Using a spatula gently and carefully spread the icing over the cupcakes. (Don’t worry it will not fall in the holes between the cupcakes. It really does go over the cupcakes smoothly if done properly – make sure to use
enough icing, you do not want to be able to ‘see’ the cupcakes through the layer of icing)
Step ten: You’re almost there!!! Now you should have all the cupcakes covered with a base layer of
icing. When this is done, wait for a few minutes and then you’re going to smooth the base layer. You can do this a few different ways.
1) Take a smooth paper towel (unless you want the design from the paper towel to be the background of the cake) and when the icing has set, lay the paper towel on the cake and gently smooth your hand over the towel leveling the icing into a smooth layer)
2) The same can be done above but using parchment paper instead of paper towels.
3) Use an icing spatula dipped in warm water and run it smoothly across the icing to get a flat smooth base layer to work with.
Step eleven: Once you have a smooth base layer, you can begin decorating. Design it up, be creative, let the creative juices flow!!! After putting the main design on, simply place a border around the entire cake and you’re DONE!!
Alternate way of making cupcake cakes:
There is another method to making cupcake cakes, but it’s a bit trickier than the previously outlined method.
This comes in handy though if you want to make a certain shape and don’t want to lay out each and every cupcake on a cake board.
1) You simply get the shaped cake pan that you desire (above picture was done using a heart shaped cake pan).
2) Place double lined cupcake liners in the cake pan.
3) Fill each cupcake liner to the top with cake batter (this will enable to the cupcakes to bake up and connect with each other, forming a complete layer of cake).
4) Bake cupcakes until done.
5) Remove from oven and cool briefly IN the pan.
6) Now comes the ‘tricky’ part. You will need TWO cake boards for this. You will place one cake board over the top of the cake pan and carefully flip the cake pan over so it’s now on top of the cake board. Then take the second cake board and place on the ‘top’ of the cupcake cake (which is now face down on the other board – you may also want to place some icing on the second cake board so when you flip it all again the cupcakes stay in place) Now, flip the cake boards and remove the top one so that the cupcakes.
are face up and ready to be decorated. (some people don’t like this method because they don’t like to take a chance with all the ‘flipping’).
7) You may also want to tie curling ribbon or string around the entire cupcake cake to ensure the cupcakes stay together.
8) Then simply decorate as normal and enjoy.


