One way I like to decorate terra cotta or ceramic pots is by covering them with mosaic pieces that I have personally designed. Mosaic is an art involving small pieces of rock, shell, tile, glass or other objects that can be joined together to create a picture, pattern, or abstract. Mosaic pieces are cemented to other objects, usually following a pattern, to create the desired look. Using a pattern as a guide is helpful, but I sometimes use mosaic pieces in a free-form design to decorate an object. To create a stamped mosaic planter with a free-form design, I will use terra cotta pieces, marbles, rubber stamps, paint, and grout.
For this project, I will be covering an eight-inch pot and will need the following:
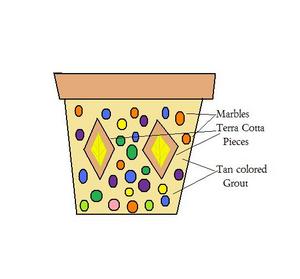
-Terra cotta pot (8 inches in diameter)
-Terra cotta pieces (6 – 2-inch by 3-inch jagged edged squares)
-Marbles (2 dozen of color variety, all of medium size)
-Rubber stamps (will be using 2-inch leaf design)
-Acrylic paint (light green and mustard color)
-Clear enamel (you can use the kind that comes in a spray can)
-Tile adhesive
-Grout
-Brown paper bags
-Sponge
-Rubber or surgical gloves
Terra Cotta Pot, Pieces and Marble Instructions
First, I clean the pot and terra cotta pieces with soapy water and let dry. I then apply a layer of clear enamel to inside and outside of the pot. The enamel will protect the terra cotta from absorbing too much moisture from the grouting process, allowing it to dry faster.
While my pot is drying, I will rubber stamp and paint the six terra cotta pieces. I center the stamp on the point of the terra cotta piece, because I want to attach these to the pot so they are in a diamond pattern. I like to paint my leaves green and use the mustard color for highlighting. You may want to use black to cover the stem and veins. After I have my pieces painted and they have thoroughly dried, I apply a layer of clear enamel.
Once the clear enamel has dried on the painted terra cotta pieces, I use the tile adhesive to attach them around the outside center of the pot, spacing them evenly apart. I then glue marbles to the remaining area of the pot, filling in the gaps. You can decorate the top rim of the pot or leave it plain (your choice).
Grout Instructions
I use rubber or surgical gloves when mixing and applying grout. I follow the manufacturer’s instructions on the container for mixing the grout, and apply the grout to the entire mosaic area, filling in the spaces between the pieces and marbles. I let the grout set about ten minutes and then remove any excessive grout on the items by rubbing with a brown paper bag or damp sponge. I do this gently, so as I do not want the terra cotta pieces or marbles to shift or pop off. I let the pot dry overnight. In the morning, I fill it with dirt and a favorite plant.
Sources: Personal experience, Wikipedia, Hammerzone.com


