It is not difficult to make a four-tiled “puzzle” out of clay. This is a great project for anyone starting out in clay, an artist looking to try something new, or as a craft project with your family. In order to make a clay tile puzzle, there are specific supplies you need. Once the supplies have been gathered or purchased, follow the technique instructions for creating the tiles. Decorative ideas for clay tile puzzles are also described in this article.
Supplies for a Clay Tile Puzzle
Supplies needed to make a clay tile puzzle include:
Clay – First, determine the type of clay you will need to use for your clay tile puzzle. If you happen to have a kiln or access to one, standard stoneware clay is the preferred clay for this clay tile puzzle project. For those without access to a kiln, you will need to use self-hardening clay, which can be purchased in a craft store. Another option for the clay tile puzzle project is to make your own self-hardening clay.
To make your own self-hardening clay, mix four cups of flour, one teaspoon of alum (from the grocer’s spice aisle) and one and a half cups of salt. Gradually add the water (up to one and 1/2 cups) until you can form a ball. Knead the dough until it sticks together, adding water as needed.
Rolling pin – You will also need a rolling pin to make a clay tile puzzle. Use an old one or purchase an inexpensive one, if you plan on creating multiple clay slab projects. Do not use the same rolling pin you use for cookies.
Cloth – Clay likes to stick to plastic and wooden surfaces like your tabletop. By using a large piece of cloth, it will be easier to lift and removed finalized clay puzzle tiles without ruining them. Find an old pillowcase or other scrap materials in your home. Fabric stores also sell very inexpensive scrap pieces of material.
Clay cutting tool – For the clay tile puzzle project you will need to cut the pieces with a wooden knife that comes in any standard pottery tool kit, or use a plastic knife you have at home.
Ruler – Any wooden ruler will help ensure that your clay puzzle tiles are the same size.
Paint – Once the clay tile puzzle is dry it can be decorated. If you are using a kiln, use pottery glazes. For self-hardening clay the puzzle tiles may be decorated with acrylic paints, school paints, tempera paints or liquid crayons.
Clay Tile Puzzle Technique
Lay the cloth on a flat surface. Form the clay into a ball. If the clay is store-bought, it will take some kneading to make it pliable. Place the clay ball on the table and use the rolling pin to make an even and flat slab.
Use the ruler to measure the exterior square of the puzzle. A workable size would be to have an 8×8 square from which you can cut four squares. Make the square bigger or smaller for your own clay tile puzzle. Divide the square into four even pieces (or more) using the ruler and a cutting tool.
Once the square clay puzzle tiles are cut, remove the excess clay from the outside and store in a plastic bag. Lift each clay puzzle tile carefully and smooth down the edges with your fingers.
For kiln users, follow your kiln directions and decorate when the tiles have had ample cooling time. For self-hardening clay puzzle tiles, let the tiles dry for a minimum of two days. True drying time will depend on the climate and weather where you live.
Once the tiles are dry, use a dry but rough sponge to smooth out any edges or imperfections. Carefully wipe or blow off any dust created from the smoothing process. Now you are ready to paint and decorate them.
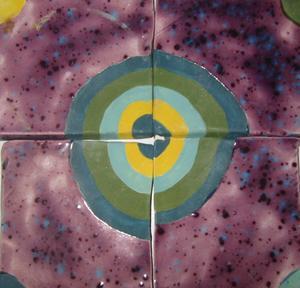
To make a true clay tile puzzle, place the tiles next to each other, forming the same square you had in the beginning. Paint the four tiles as if they still connected. For example, if painting a flower, center the flower in the middle of the big square, which is really the corners of the tiles. Or paint an abstract design. You could also carve a design into the wet clay using the cutting tool, a toothpick or other fine-edged item.
Let the tiles dry again. When finished, you will have your own unique clay tile puzzle.
Reference:
- Get inspired by the pottery of New Mexico Potters and Clay Artists: www.nmpotters.org


