These easy to make windows will add beauty to your home’s windows.
What You Will Need:
* Clear Deluxe Weight Vinyl
* Sharpie Markers Or Gallery Glass Paints
How To Make Them:
There are two methods to make these, you can choose which works best for you, or you can do both. The first method is for windows that already have a design printed on them.
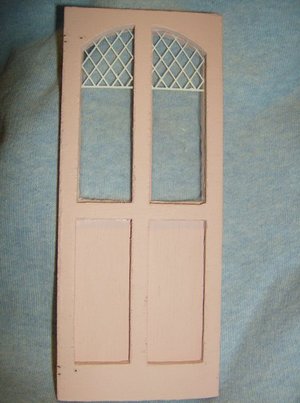
We will be working with the already printed design on your window. In my case this will be the diamond crosshatched design on the top portion of my door’s windows.
1. Take your clear vinyl and cut a length larger than the size of your window. In general you will want it to at the very least have a border that you could tape or glue it into place without having to glue directly to your window.
2. Lay the vinyl over the front of the window and draw out the design over the clear vinyl. I used a black ultra thin sharpie marker for this step.
3. After you have successfully traced the design you wish to color in to the vinyl, remove it from the window and place on a firm surface. I’d suggest either a window or a piece of white paper on a table.
4. Take your Gallery Glass or markers and color the design as you wish.
5. Let dry.
6. Place behind your window to assure that it lines up correctly. If it’s all lined up right, you may either neaten up your coloring or darken it if you so choose. If it looks fine you are all done and ready to glue or tape it to the back of your window.
The second type of stained glass window is slightly different. Instead of using the pre designed windows, we will be making our own designs. These can be either a full window design or one with a frame around it designed to hang as a decoration within the windows.
1. Choose a design that either appeals to you, or your décor. You can use clip art found online, stickers, or draw your own design.
2. Trace it onto the vinyl.
3. Color it in as you see fit.
4. Let dry.
5. Touch up if needed and hang.
6. If you will use the framed window add a frame of black or metal tone cardstock around your “window.” Glue or tape it in place
7. Add a chain, thread or string to the top for hanging, or if you wish you can glue it directly to your window. **Warning** If you glue it to the window be sure you will not want to remove the decorative window in the future, as removing it could harm your home or room box’s windows permanently.
Hint, Tips and Ideas:
* The lighter shades of Sharpies seem to blend better and streak less than the darker tones.
* Try coloring your window on a window in your home or a TV. This allows you to be able to see how even your strokes are while coloring and if there’s any streaks. Thus, your window will wind up being much more evenly colored.
* If you cannot locate the double weight vinyl, you can try using the clear plastic packaging from toys or clear top loading sheet protectors. Also the plastic sheets for used for photo album sleeves would be suitable.
* For a beveled glass look, try the textured top loading sheet protectors instead of the smooth ones, or the smooth plastic packaging and vinyl.
* If you do not intend to always have your window decorated with the stained glass design, I’d suggest you taping it to the inside of your door or window with removable tapes. Also, I’d suggest that you face the colored side OUT from the window. This will assure that no paint or marker is transferred to the actual windows from time, heat and other conditions.
* For a more authentic stained glass window look, try making your lines slightly thicker to mimic metals used in making windows. Remember your scale proportions, though so that you don’t make them too thick.
Most of all have fun and let your creativity run wild with your windows and designs.