There are a variety of arts and crafts that can be created using dried gourds. Gourds come in literally hundreds of shapes and sizes, last for more than a lifetime, and are fun and easy to use for a variety of craft projects. Dried gourds, however, can be fairly expensive. One medium-sized gourd, perhaps for a birdhouse craft, will cost you a minimum of $8.00 in most cases. These gourds typically still need to be cleaned and may have blemishes. Buying fresh gourds, rather than dried, can save you quite a bit of money. So if you are interested in working with dried gourds, just follow these simple steps to purchase and dry your own fresh gourds.
First of all, you need to know what types of gourds to look for. Most gourds wo;; dry very well. The only varieties that will not dry are pumpkins, and some small ornamental gourds. These gourds will simply rot away because of their high moisture content. Most other gourds will dry just fine. These fresh gourds typically have a light green flesh. Gourds that are left on the vine for the longest amount of time possible will retain their shape best during the drying process. To find a gourd that has been left on the vine, look for one with a solid stem that shows no signs of withering. If the stem is shriveled, your gourd will be more likely to shrivel during drying as well.
The first step in drying your gourds is to scrape away the fine skin on the outside of the gourd. Using an icing spreader, or a non-serrated butter knife, gently scratch the surface of the gourd to remove the skin. This can sometimes be labor intensive, but removing the skin before trying to try the gourd will help it to dry faster and more uniform. The removal of the skin lets more moisture escape from the gourd, as it dries from the outside in.
Once the skin is removed, your gourd will need to be placed in a dry place for up to a year (or possibly more for an exceptionally large gourd) to dry. Smaller gourds will dry much more quickly than very large gourds. The best way to dry a gourd is to drill a hole in the stem and run fishing line through it. Then hang your gourds up where they are not touching anything. This will make sure the gourds do not get any rotten spots where they have been sitting. Very heavy gourds, or those with a weaker stem, however, cannot be hung. For gourds that are not hung, you will need to rotate them frequently to keep any one spot from rotting away.
Once you have your gourds prepped for drying, you simply have to wait. It is possible that mold may form on the outside of the gourd. If this happens, just scrub the gourd with a scouring pad with diluted bleach water once it has completely dried. Be careful not to let the gourd set submerged in the water for too long.
To know whether or not your gourd is fully dry, rap the side of the gourd firmly with your hand and then shake it. You should be able to hear the dried seeds shaking around inside. If you don’t hear anything, try again. If you still do not hear anything, your gourd may need some more time to dry. Once you have dried gourds a few times, you will be able to easily tell which gourds are ready to use for crafts.
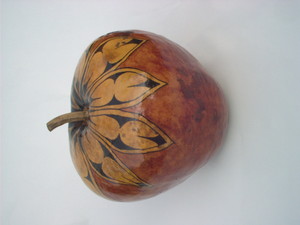
Dried gourds can be decorated, carved, or wood burned. Drills and small saws can be used for carving. Wood burning tools work great on gourds, just be sure to use them in a well ventilated place. Art media such as oil pastels, acrylic paints, colored pencils, charcoal, and leather dyes all work well on gourds. A finished piece may be sealed with an oil-based varnish.
Try your hand at drying your own gourds for crafting. Once the process is complete, you will be so proud to have created your very own piece of art, truly from scratch.