Controlling rain runoff and mud has been an ongoing challenge with red clay and rocky soil conditions in Sevierville, TN. Our manufactured home is also located on the side of a hill worsening slick surroundings and causing dangerous walking conditions. After refinancing our mobile home , I have tried many home improvements to dry up the muddy situation including using beach sand in our yard , creating river rock pathways with raised flower beds, retaining walls and burying several drainage lines around our house. Here are the basic steps with pictures of how to bury lines and possible ways to conceal drainage lines.
Planning and Design of Drainage Lines
My brother’s house has a slope running down to his garage and he’s buried several long drainage lines to prevent flooding in his basement as a result of heavy rain. When planning and designing a drainage line, first consider how much water is being controlled and how far does it have to travel. Second, before digging, look for cable or electrical boxes, water lines, etc. that are only a few feet from the top of the ground. For runoff lines from gutters, I prefer corrugated sewer pipes, because they are cheap, lightweight, durable, and easy to direct in any manner needed. Corrugated sewer pipes are manufactured in several varieties from solid pipe, to slotted all over or holes on the bottom. I prefer drainage holes, so that water doesn’t pool at the end.
Preparing a Trench
Hardware stores sell corrugated sewer lines in 10 foot lengths (shortest), which is sufficient for drainage lines on single family homes with flat yards that don’t have problems with standing water or pooling. If water settles in your yard after rain, then running longer drainage lines to the lowest points on your property or towards ditches can help. Your trench should be at least two feet deep with three inches of base rock under the drainage line (2 ½ feet total). Less than 2 feet and you risk ruining the line if too much weight moves over the top. My area is mostly rock and even with a pick axe a 2 foot depth is hard to achieve, so I raised the ground level to provide more depth, improve drainage and walking conditions near the home. The bottom of the trench should be no more than a foot wide with a slight downward pitch, moving water away from the home.
Back filling the Trench
After the trench is properly dug moving water away from the home and base rock is placed along the bottom, put the corrugated sewer line in making sure there is sufficient length (if needed). If you plan to connect it to the gutter, you can buy a flexible connector, or take the bottom of the gutter off and slide it on for a closer fit. They also make a heavy duty plastic box with a cover grate that you can connect to the corrugated sewer line for the water to pour into, providing a cleaner look. Once ready, hold the drainage line down with large rock or brick making sure it doesn’t move until you have the drainage line securely held in place with rock or dirt. Place more rock or gravel over the length of the pipe and back-fill with topsoil.
Finishing Drainage Line and Clean Up
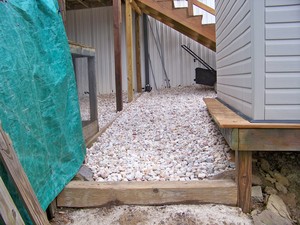
Before back filling the trench completely, I dig a two foot wide hole at the end of the pipe for additional runoff drainage that I fill with gravel as well then cover (optional). After all the drainage line is back filled, cover the area with sod or grass seed if desired to bring back original look. Settling will occur above the line, so getting topsoil to raise the ground over the trench a few inches is recommended. I incorporated my drainage areas into rock pathways and flower beds. Last, you can use large stones or shrubs to hide the gutter spouts going into the ground.
Please visit my DIY website @ DIYforanyone.com for more home improvement and money saving tips.