If ordinary pet stairs prove too short in the bedroom, why not learn how to build dog stairs for beds? It’s hard to find store-bought dog stairs that are high enough to help dogs up to a queen-sized bed. And when dog stairs are high, the stairs are too steep. To accommodate the needs of may aging Pomeranian, who also suffers from poor eyesight, I designed dog stairs for beds with 4 steps, at varying heights and sizes for added comfort, and with a coat of paint that can be seen in the dark of night. Here’s how I built my dog stairs for beds so you can build one for your furry friend.
What you’ll need to build dog stairs for beds
2 planks of wood fence, 5.5 inches wide.
1 plank of 6 inch wide lumber, 12 feet long (you can use the store’s cutting services to cut the lumber in half, to ease transport in your car).
2×2 lumber, 17 inches long
2×4 lumber, 34 inches long
Wood screws
Drill
Saw
Metal spray paint.
Here’s how to build dog stairs for beds:
Step #1.
Cut three 16 inch long sections from the plank of 6 inch lumber. Position them on their 2 inch sides to form a square without a bottom (2 parallel, 1 on top). Screw the pieces together. This will form the base of the dog stairs you are building.
Step #2.
Cut the fence wood into five sections of 16 inch long wood. Place one piece over the base of the dog stairs you build in step 1. Place it flush at the end, to form the first, main step in the dog stairs for beds. Screw in place.
Step #3.
Take another 16 inch long fence wood piece and place it perpendicular to the step you built, to form the vertical part of the next step. Cut two 12 inch long sections from the remaining plank of 6 inch lumber, and place them on their 2 inch sides, over the dog stair frame. With the fence wood that you already put in place, you will have formed a second square without a bottom. Screw the pieces together, then top this stair with another piece of fence wood as you did for the step below. At this point, you will have built two steps in the dog stairs for beds.
Step #4.
Again, take a 16 inch long fence wood piece and place it perpendicular to the previous step you built, to form the vertical part of the last step. Cut two 6.5 inch long sections from the remaining plank of 6 inch lumber, and place them on their 2 inch sides, over the dog stair frame. With the fence wood that you already put in place, you will have formed a third square without a bottom. Screw the pieces together, then top this stair with another piece of fence wood as you did for the step below. Since this is the last step, place fence wood over the remaining exposed section of the dog stair frame, measure how wide a piece you should cut to supplement the current stair and conceal the frame completely. This will form an extra wide step on the top of the dog stairs, for easy up and down climbing onto beds.
Step #5.
To connect the three dog stair sections together, cut two 16 inch long sections of 2×4 lumber and insert them inside the frame of the dog stairs, on either sides. Screw the lumber together to fasten the dog stairs into a single unit.
Step #6.
Add another stair below the first for dogs who fear steep stairs. Make the stair top out of the remaining 6 inch wide lumber, and the frame beneath the stair with 2×2 lumber.
Step #7.
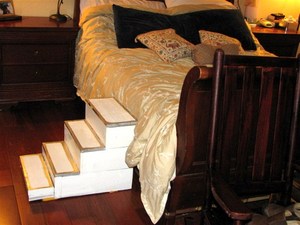
Paint the pet stairs for beds with glossy white that will be easy to see in a dark room at night. Once the paint is dry, stick painter’s tape over the flat step in each stair to cover a central rectangle and leave the edges exposed for highlight painting (see picture). Use metal paint that will really stand out in the dark, allowing the dog to see where one step starts and another ends.
And if you’re looking for dog stairs for sofas, read my article on how I built dog stairs with 3 steps and custom wood paint to match my living room.


