You can build your own toddlers wooden rocking horse with this easy to follow tutorial. For just a few extra hours and a few extra dollars you can easily build your child a wooden rocking horse!
Head on down to your local home improvement center or lumber yard and pick out some suitable materials. You’ll need A few things first to start this project. Pick out ten feet of nice looking 2×10. Yellow pine or white spruce are both great choices for finish woods. Pressboard or plywood are suitable materials for a painted wooden rocking horse.
You also need about four feet of 1×8. You might be able to have a four foot piece cut from stock at some local home improvement centers or indoor lumber yards like Lowe’s or Home Depot. You might get stuck with a four foot leftover if you’re forced to buy an eight footer.
A few 2 ½ “wood screws are needed to secure the three pieces along with some wood glue. Don’t forget the ¾ “wooden dowel. You only need 9 ½ “if you’re able to buy it that length.
Once you have you’re materials home, its time to cut the lumber to length. Start by cutting the bottom rocker assembly first. Cut two pieces of the 1×10 at 36” long with a circular saw or miter box. These are the two rockers. Set these aside for now and label them as “bottom rockers”.
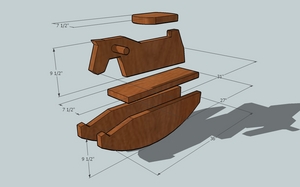
Now cut the other section of the “bottom rocker assembly”. Cut the 1×8 at 27″ long. This will be the top of the “bottom rocker assembly” Set these in the correct pile and set them aside.
Now cut the “upper rocker assembly”. Layout the remaining 1×10 and cut it 31″ long. Label this section “horse body”. Place this in the “upper rocker assembly” pile.
Cut the remaining piece of 1×8 to 11″. This piece is the “seat” and goes with the “upper rocker assembly” parts.
Now plug in a jigsaw, scroll saw or band saw and cut out the shape of the horse. You can trace my design or any design you see fit as long as two factors are met. One, the bottom must remain 27″ long and two, the top seat must be 11″ long. Drill the ¾ “hole for the dowel near the neck of the “horse body”, easily within reach of a child.
Also cut the two “bottom rockers” with a jigsaw, band saw or a scroll saw. Again use the template in this article or create your own as long as you leave 27″ flat for the upper rocker assembly to rest on.
Finally cut the “seat” by rounding the corners to your specifications. If you plan on doing any decorative work with a router or engraver, do so at this time. Sand all the pieces prior to assembly.
Attach the other section of the “bottom rocker assembly” to the “bottom rockers” with three 2 ½ “wood screws into each rocker. Don’t forget to add wood glue in between the rockers before you set the screws and don’t forget to pre-drill.
Now attach the “seat” to the “horse body” with four 2 ½ woods screws pre-drilling and wood gluing before you set the screws.
Finally attach the “upper rocker assembly” to the “bottom rocker assembly” using four 2 ½” wood screws. Pre-drill and use wood glue as you did in the last two steps.
Fill in all of the screw holes with matching color wood putty. Sand, varnish or paint and your child is ready to ride their new all wood rocking horse!