A wooden retaining wall is a good idea when building time is at a premium or there is only a narrow space to build one in. Otherwise, wooden retaining walls have considerable drawbacks, such as short lifespan (around five to ten years for redwood retaining walls, a bit longer for pressure treated ones) and toxic compounds leaching into the soil from pressure treated wood. Do not plant vegetable gardens close to pressure treated retaining walls. Also, building one takes considerably more skill and tools than broken concrete or specialty block walls.
You will need these tools:
Shovel
Posthole digger
Mini sledge hammer
String line
Post level
Line level
Power saw
Power drill
You will need these materials:
Redwood or pressure treated 4″x4″ posts
Redwood or pressure treated 2″x12″ boards
3′ wooden stakes
Galvanized or plastic coated 3½” wood screws
Posthole concrete mix
Wood preservative (such as Copper-Green)
Plastic cup
Small paintbrush
If working on a slope, cut it back with a shovel so you have at least a foot of room behind the back of the wall to work in and build a drain.
Dig the Postholes
Then you will need to set a guide line. This will determine the exact position of your wall, and is crucial to the setting of the posts. Drive two stakes into the ground a foot or two farther than you want the ends of the retaining wall to stand. Tie the string to one stake, then set the line level on it, and tie it taut and level to the other stake. Hang the line level in the middle of the string, because it will sag no matter what. Dig the postholes along this line no more than four feet apart from each other, with one at each end. The postholes should be several inches deeper than the wall is high, i.e. ½ of the post should be underground. Be careful with your guide line when doing this!
Set the Posts
This is the most demanding part of the project. All the posts must face exactly the same direction, and also exactly vertical! (Actually, the wall should slope back about ten degrees towards the hillside. To do this, use a plumb line and a protractor set on the post.)
After cutting the 4’x4’s to length, paint the ends with wood preservative. Using one screw on each, screw two wooden stakes diagonally to each post about a foot away from the middle of the post, and perpendicular to each other. These are the first part of the scaffolding that will hold the post at the correct position before the concrete is poured. Place a post in a posthole a few inches from the bottom and use the guide line to determine which way it should face (you may need to set a new guide line), and a post level to keep it straight. Drive a stake into the ground right next to each scaffolding stake, and screw these together with one screw. Check again to see if the post is straight (it probably isn’t, which is why we only used one screw in each connection in the scaffolding.), and it is not pushing on the guide line. This part is very hard if working alone! When all the posts are set like this, pour dry posthole concrete mix into the holes and water them thoroughly.
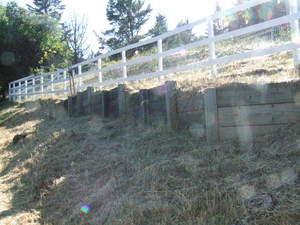
Attach the Boards
Cut the boards to length and paint all the exposed ends with wood preservative. Using a bubble level or the guide line, set the first board level and screw it in behind the posts, i.e. between the posts and the ground that is being retained. Use the bottom board to level the ones above.
Now that the wall is built, it is a good idea to put filter fabric behind it to keep mud from seeping through, and a drain to keep too much water from building up behind the wall. Do not build a retaining wall more than three feet high without consulting with your local permitting agency.