Anyone that dives into a big building project knows the dilemma of trying to figure out what to do with all the scrap building materials that they have acquired through their building experience. I have been working on a lake house for the past few years and with every project I tackle, I find myself acquiring more and more scrap materials that I have to find a use for.
A wishing well is a perfect craft project to get started on to rid yourself of some of your left over wood and other building materials. It is a fairly simple project that just about anyone can tackle if they are willing to spend a little time on it. I love the look of an old fashioned wishing well. They not only add a touch of charm to your yard, but they also give you a way to add a little magic to stories you share in your yard with children.
It will not take you long or cost you much to get started on this project. The items needed to build the wishing well can be switched up and just about any building materials can be used. Here is all you will need to get started in making your very own wishing well. If you do not have these materials left over from a previous project, consider clicking here to find everything you will need.
Items Needed To Construct A Wishing Well:
1. 20 – 30 bricks or stones
2. 20 – 30 wood blocks
3. 2 rectangular pieces of wood ( 1ft x 2ft )
4. 2 triangular shaped pieces of wood ( cut to fit )
5. 2 two foot long wooden posts
6. 8 – 10 roofing shingles
7. A hammer and nails
8. A very strong glue
Constructing the Wishing Well Base:
Getting started on the base of your wishing well is one of the easiest parts of this project. The base is so easy to construct that even small children can help and get in on the fun. All you have to do is to use your bricks to make a small circle on the ground. Space the bricks very evenly and leave a small gap of about an inch between each one.
As you begin to add the second layer of bricks you will want to stagger them so that this round covers the one inch gaps you left between the bricks on the first layer. Use your strong glue and dot two small dots of it on the bottom edges of your bricks. Be sure to press them down firmly and give them plenty of time to dry.
You will want to keep adding and staggering layers of bricks till you have a nice base or until you run out of bricks. After that, you will want to keep building up but this time , use your rectangular blocks of wood. Add layers of staggered wood blocks until the base of your wishing well is the height you desire.
Constructing the Top of the Wishing Well:
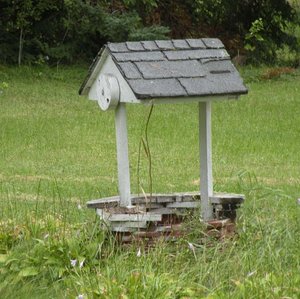
You will want to start by cutting your triangle pieces of wood to fit between your two top rectangular pieces perfectly. The picture of the wishing well featured with this article gives a good example of just how you want to cut it. Use your hammer and nails to attach the rectangular pieces to the triangular pieces to achieve making the top of your wishing well.
Once you have the top nailed together and stable, you will want to add your roofing shingles to give it the look of an old fashioned wishing well. Simply layer and nail or glue your left over roofing shingles to the top to hold them firmly in place. Give the glue plenty of time to dry before attempting to move the top or add it on to the base.
Finishing Touches for the Wishing Well:
All that you have to do now to finish the construction of your homemade wishing well is to attach the top to the base. This can be done in a very simple manner by using your two wooden posts that are approximately two feet long each.
The easiest way to go about this is to hammer the posts into the ground just inside of the base of your wishing well. Be sure to hammer them in deep enough that they will stay put and hold up to the weight of the top you just made. You will also want to be sure that you space them properly so that you can hammer the posts into the inside of the top of the wishing well. Use as many nails as you need to be sure that the top is being held up firmly.
After you stand back and look at the wishing well, you might want to consider adding a string and bucket to it just for decoration. You might also want to make a little box or cup to put beside it to keep a few pennies in for those that want to make a wish.
I hope you enjoyed this outdoor craft project. If you had fun with this project, you might want to consider clicking here for more of my craft and hobby articles.
Source :
http://www.lowes.com/