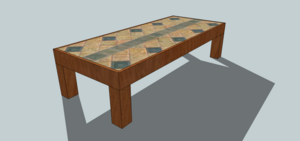
A coffee table is the center piece in nearly every living room. Whether it’s holding magazines, remotes, food or even coffee, a tile coffee table is always in use. With the hard tile surface, spills, stains and scratches are a thing of the past. Best of all with the tile top design, you can create almost any mosaic you want; imaginations the only limit.
Begin by selecting the tile first; you may need to tweak the dimensions to fit the tile without cuts. This tile coffee table is designed to fit tiles that fall in a two foot wide by five feet long area. Ask a sales associate at your local home improvement center or tile contractors supply which tiles best fit the dimensions. Cutting the tile is ok, but it is easier to simply cut the table to a dimension that fits your tile.
Once the tile has been chosen, select a matching grout. You’ll also need mastic and all of the tools that go along with a tile job. You’ll also need a few other materials. An eight foot long 4×4 for the legs, a sheet of ¾” plywood for the sub-surface, two eight foot long 1×6’s and a box of 1 ¾” wood screws. Don’t forget the woodworking tools!
Begin by cutting each one of the legs. Using a miter saw cut each leg to 13″ long. You can also use a circular saw, just make sure you mark the 4×4 with a square all the way around first. This will ensure you keep a square cut as cut around the leg.
Next, cut out the notch on each leg according to the Slide Show Blueprints. Use a table saw to cut out each notch. Set the blade to ¾” and make a pass on the two sides of the 4×4 that are to be notched. Use a band saw or hand saw to finish cutting out the notch from the top down 2 ½”.
Dry lay your tile to fit on your sheet of plywood. Make a reference mark on each side and use a tape measure and chalk box to square up the piece. Use a circular saw to cut the sheet of plywood.
Now attach the plywood to the legs using four 1 ¾” wood screws in each leg. Screw them down through the top of the plywood into each leg. Slightly countersink each one.
Cut two pieces of 1×6 for the long sides and two pieces of 1×6 for the short sides according to the Slide Show Blueprints. Use a miter saw to cut 45 degree angles on each end. If you had to change the layout of the table due to the tile differences, that’s ok. Simply measure the dimensions of the plywood and transfer it to the 1×6 on the short side. Attach them to the leg notches using the screws. Pre-drill a countersink and make a few plugs with some scrap material to fill in the screw holes when you’re done. Glue in the plugs and cut them off with a Japanese saw.
Finally add the mastic and tile and allow it to dry overnight. Mix in the grout and clean allowing it to dry for 24 hours prior to use.