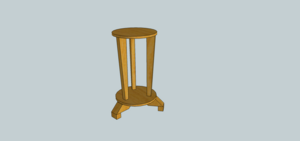
A round side table can be a great way to display collectibles, plants or pictures. This attractive all-wood 2′ tall round side table can be easily made with a minimum of materials, tools and woodworking experience. In just a few hours you can have your own all-wood round top side table.
Begin by selecting a good species of wood suitable to its use and location. For instance, an indoor clear finish round table should be made from the finest woods like cherry or oak. For outdoor patio furniture or porch plant shelves, use a pressure treated lumber. The project calls for two 16″ diameter round tables. For clear finish projects you’ll need to glue 1×10 pieces together and rip down the sides. Plywood or composites can be used if the project is to be painted. Wood glue and ½” dowels join the project together.
Begin by cutting the three legs to length according to the slide show blueprints. Using a table saw and a taper jig, taper each leg down from 3″ to 1 ½” on one side. Sand and finish each leg. Allow the legs to dry before assembling them to the table tops.
Next cut the two table tops. If you need to glue the two 1×10’s together, do so at this time, clamp it together and allow it to dry overnight before continuing. Using a compass or 8″ string, scribe a perfect circle out on one of the table top boards. The circle should be 16″ in circumference. Now tape the two table top pieces together and cut them out using a band saw, jigsaw or scroll saw. Sand and finish each piece and allow it to dry before continuing to the next step.
With a pencil, section off the bottom of one of the table tops into three equal sections. Imagine a peace sign. Now make a mark on each section ½” in from the edge. This mark will be for the legs.
Drill a ½” dowel into the bottom of each leg and glue it in place as shown in the slide show blueprints. Make a matching hole on the table top. Glue each leg in place with wood glue, making certain each taper faces out. Wipe away any excess glue with a damp sponge.
Make the same pencil mark peace sign on each side of the remaining table top piece. Cut out the bottom legs and castors according to the slide show blueprints. Glue each of the castors to the bottom legs as shown and allow it to dry. Now glue each of the bottom legs to the bottom of the remaining table top. Allow it to dry thoroughly before attaching the last section with wood glue and ½” dowels according to the slide show blueprints.


