It doesn’t matter what kind of business you run, you can always benefit from gift certificates. You don’t even need the bankroll of a corporation to utilize them; sure, they won’t be nifty little plastic cards, but they’ll still be great and your customers will eat them up.
Creating gift certificates in Microsoft Word is quick and easy. Once you create the “template”, you can quickly print off hundreds of gift certificates with no extra work. This guide will show you how.
How to Make Gift Certificates in Microsoft Word
We’re going to go through this step-by-step with a lot of detail so that even if you’ve only used Microsoft Word a time or two, you won’t be left behind. For those who are more familiar with the software, you can usually figure out exactly what you need to do by reading the title of each step.
Let’s dig in, shall we?
1. Set up a Landscape Document: Open Microsoft Word. We want our paper to run sideways instead of up and down, so that we can fit more certificates on a single page. To do that, we’re going to click “File” and choose “Page Setup”. All that you need to do now is click the “Landscape” icon and then click “OK”. We won’t mess with margins or anything else, just to keep it easy and so that we’re sure that our printer will print the whole page and not cut anything off.
2. Add a 3 x 2 Table: Underneath your main toolbar (the one with “File”, “Edit”, “View”, etc.) should be a second toolbar that’s filled with icons. Hovering over these icons will reveal names like “New”, “Open”, and “Save”. If you don’t see this toolbar, click “View”, choose “Toolbars”, and tick the “Standard” option.
The icon we’re specifically looking for is the “Insert Table” icon. It is in the same group as the icon that looks like a globe with a chain in front of it. You can continue hovering over icons until you find the right one, and when you do, click it to open a little window. In this window, move your mouse so that two boxes wide and three boxes long are shaded in. Then click once. This will add a table to your document that has 6 cells – 2 wide and 3 tall.
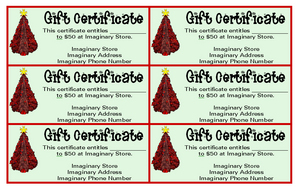
3. Add a Background Color: Remember to choose a color that is light enough for your text to be easy to read. You don’t want customers squinting to see what their gift certificate is even for. Deciding to stick with a Christmas theme, I’ve chosen a light green for my background color. To add a background color, right-click a cell and choose “Borders and Shading”. In the dialog that opens, click the “Shading” tab. Then, choose a color. Click “OK” when you’re done.
4. Add Borders: Adding borders will do a couple of things for our finished gift certificates, but the most important one might be that they give us lines to cut on. Adding a border is easy. Right-click in your cell again and choose “Borders and Shading”. This time, click the “Borders” tab. Within this dialog, you can choose the color of the border you want to use, as well as the style of the border. Reference Illustration 01.
5. Add Images: If you have an image or images that you want to add to your gift certificate, now’s the time to do it. Your images should either have a transparent background, or their background should be the same color as the background of your cell.
To add an image, click “Insert” and choose “Picture”, then click “From File” or “From Gallery”, depending on your preference. Navigate to the image you want to use and click “OK”. Once the image has been added, click it once to bring up the Picture Toolbar. Within that toolbar, click the icon that looks like a dog. Choose the “Tight” option, and click off your image.
6. Add Text: This is the final step in our gift certifcate creation, and the easiest one. All that you need to add is the words “Gift Certificate”, your business name and address, and the value of the certificate. Most businesses will choose to do certificates in the amounts of $10, $25, and $50. Then, these certificates can be purchased in multiples to add up to a higher amount.
Save your work, print it on nice paper, and enjoy!