Fashion accessories are going DIY. With celebrities and stay at home moms alike wearing homemade jewelry, it is easy to see why it has become so popular. Knitting has also been making a big comeback and is no longer viewed as a “granny activity”. Even celebrities like David Arquette are knitting. This free pattern for a knitted bracelet is so quick and easy that you will want to pull out your needles and yarn right away and make some DIY bracelets for all of your friends.
You will need:
Small amount of lace weight yarn
2 double pointed needles US size 5
Needle for weaving in ends and connecting
Clear thread and coordinating seed beads (optional)
Jewelry charms (optional)
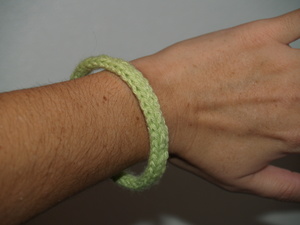
This free pattern uses i-cord to create a comfortable yet funky bracelet.
I-Cord Instructions
To knit in i-cord simply knit the number of stitches you have cast on. Do not turn work at the end of the row. Move your stitches to the other side of the double pointed needle. Carrying the working yarn across the back, knit the first stitch on the needle which will be the last stitch you just knit before sliding the stitches over. Your i-cord will begin to look like a rope or a closed tube.
Instructions:
Knit the Bracelet
Cast on 5 stitches leaving at least a 3″ tail. Do not turn work and being working in i-cord.
You will continue knitting in i-cord until your strip is long enough to comfortably fit around your wrist, about 7″. Bind off the five stitches. Using the 3″ tail you left when casting on, stitch the ends of the ring together. You will now have a homemade ring that fits your finger.
Option 1: Add the Beads
To add a little sparkle and shine to your new knitted ring, you can now add some seed beads in a coordinating color of your choice. This is also a good way to help cover up any small blemishes you may have made when closing the knit ring.
Bring the needle up through the inside of the ring. Thread a seed bead over the needle and down the clear thread until it rests comfortably on the ring. Insert your needle very close to where you bought it up through the fabric and pull firmly. This will attach one bead. Continue in this manner until you have created a design that pleases you. You can create a simple row of seed beads across the top of the knit bracelet or you can cluster them and have them appear like a stone. The options are endless. Be sure to weave in all loose ends of yarn and to fasten off your clear thread when you are done beading.
Option 2:
Attach the Charms
Adding charms to your bracelet will create a little whimsy and only takes a little work. Thread a needle with your clear thread and knot the end. Pull the needle through the back of the knit bracelet to the front. Loop the thread and needle through the charm and insert the needle right next to where you just pulled it through. Take an extra small stitch through the back to secure and finish off.
Wear your new knit jewelry proudly and tell everyone who asks that it was your simply DIY jewelry project.


