When winter comes, it’s nice to take a break from holiday decorations and do some crafts that celebrate the season. Penguin crafts are a great way to celebrate winter; they also make a nice addition to a unit on penguins, marine life, or animals in general. These easy penguin crafts for kids are so simple and fun, they would even be great for a rainy or snowy day indoors or for a kids’ party. The four simple penguin crafts for preschoolers through elementary-aged children below are perfect for school or home. Each penguin craft lists materials and instructions, and all of these easy penguin crafts for kids are guaranteed to be a lot of fun. Enjoy!
Fingerpaint Penguin Shirts
You Will Need:
Black Fabric Paint
Black, white, and orange puff paint
Iridescent glitter fabric paint
A white t-shirt or sweatshirt
Directions:
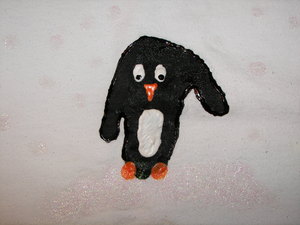
1. Dip a child’s hand, palm side down, into black fabric paint. Place the upside down handprint on the shirt with the 3 middle fingers together and the thumb and pinky fingers facing outward on an angle. The 3 middle fingers form the body, and the thumb and pinky form the wings (see photo).
2. Outline the handprint in black puff paint. Using the white puff paint, make an oval in the center for the penguin’s belly and 2 circular eyes. When the eyes dry, use the black puff paint to make dots inside each eye.
3. Use the orange puff paint to draw 2 circles for feet and a triangle for the penguin’s beak.
4. Finish with the glitter paint, painting “snow” on the ground below the penguin and dots of snow around the penguin.
My son made this sweatshirt one January in preschool. He loved it so much that he wore it all winter and the next until it didn’t fit him anymore. Now, his brother wears it with pride. This technique also works just as well on paper with regular paints.
Pom-Pom Penguin Magnet
You Will Need:
1 large and 1 smaller black pom-pom
2 googly eyes
2 medium and 1 small orange pom-pom
Black and white construction paper
Hot glue gun
Magnetic Strip
Directions:
1. Glue the smaller pom-pom on top of the larger one to make the head and body. Finish the face by gluing the 2 eyes on the head and the small orange pom-pom below them to make the beak.
2. Glue the 2 medium-sized orange pom-poms on the base of the body for feet.
3. Cut out 2 ovals from the black construction paper for wings, and 1 larger oval out of the white construction paper for the tummy. Glue the tops of the wings to the sides of the large pom-pom and the white oval to the middle for a belly.
4. Glue a magnetic strip to the back of the penguin to make a magnet. Make sure the strip is long enough to support the penguin’s weight.
Another fun option is to attach a small strip of paper to the penguin’s feet with a message or a child’s name and other information as a keepsake.
Penguin Visor
You Will Need:
1 foam visor in orange or yellow
1 sheet of black foam
2 large googly eyes
Craft scissors
Hot glue gun
Directions:
1. Cut a half circle out of the black foam sheet and glue it to the top and behind the bill of the visor. (You may have to hold the foam in place until the glue begins to set so that it doesn’t pull away from the bill of the visor.)
2. Glue the eyes on the black foam to finish the penguin’s head.
This is a simple craft for a party or a school program. It’s also a fun dress-up accessory for kids to use when they play pretend. If you can’t find visors at your local craft store, they are available here.
Paper Shape Penguin
You Will Need:
Black, white, orange and blue construction paper
Small googly eyes
Scissors
Glue
Directions:
1. Cut out a large black oval for the body, 2 smaller black ovals for the wings, and 1 black circle for the head.
2. Cut out 2 small orange ovals for feet and 1 small orange triangle for the beak.
3. Cut out 1 white oval for the belly and either white squares for ice blocks or white circles for snow.
4. Glue all of the shapes of your penguin together on the piece of blue paper and glue the eyes onto the face.
5. Glue the snow shapes around the penguin in any configuration you wish, whether you want a snowfall, ice blocks, or even an igloo.
This craft is a great way to review basic shapes with children. For younger children, cut out the shapes in advance for them and let them glue it all together.


