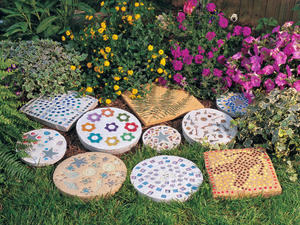
Planning ahead for garden paths is one of the joys of gardening. Keeping your shoes and feet free of mud during watering and the rainy season is another matter. The simple solution is to incorporate stepping stones (also called pavers) into the garden design. These stones can be pricey at big box and gardening stores.
The solution of course, is to make your own. You can make several stepping stones for the price of the commercial ones. Besides, when you customize your stones, your garden becomes one-of-a-kind. You can also make stepping stones as gifts for family and friends. Use them to decorate indoors as well. They make great plant stands.
You will need:
Items for the top of the stone: marbles, flat bits of linoleum, broken pieces of pottery (sanded flat and smooth), broken or whole pieces of tile, and so forth.
One bag of Quickcrete mortar mix or other fast-setting mortar mix.
One five-gallon bucket for mixing
Mixing tools, such as a heavy stick
Water to mix the mortar
Molds- commercial or home made. See notes for examples. The mold should be at least 1 ½” thick.
Cooking spray for quick release
Dust mask
Rubber gloves
Craft sticks, or sticks from the garden· Safety glasses
Masonry paint, if desired
Trowel
Step One:
Plan your design first. Place decorative items on a piece of paper the size of the mold. Remember these are going in first, so they are at the top of the stone when it comes out of the mold.
Spray the mold with cooking spray. This will allow the stone to release from the mold quickly and easily. It will not remain on the stone in the weather.
Place the decorative items in the mold.
Step Three:
Read the directions for the mortar. Don the safety glasses, dust mask and gloves. Mix according to the directions; it should be the consistency of pancake batter.
Pour into the mold carefully. Use the trowel to smooth the surface and carefully pat the mortar to remove any air bubbles.
Smooth any jagged or sharp edges to keep the stones from cracking and feet safe.
Step Five:
Place the stones in the garden in any pattern desired. You’ll find the path is as much fun as the flowers and vegetables grown.
Enjoy your new functional garden decoration and the compliments from friends and family. Make a few as gifts. Housewarming, new births, birthdays, Christmas and more can be celebrated in the garden.
Notes:
Make your own molds from planters, cat boxes, pizza boxes or even old pots and pans. Line cardboard boxes first with plastic, then spray with cooking spray. The wrinkles in the plastic create channels in the stone that allow rain to drain away and adds character.
If using cardboard molds, reinforce them with outdoor duct tape first. The mortar can press the sides out of shape, or tear the corners out.
You can also pour the mortar first and embed the objects into it. They will be raised on the stones. You may want to use these stones for decoration, as they will not be comfortable for bare feet.
Mix mortar by the cup and incorporate mortar dyes available from the DIY store. Make multi-colored stones for the garden. They’ll pop in the landscape.
For added strength in high-traffic areas, fill the mold halfway and embed hardware cloth, chicken wire or mesh into the mortar. Fill the mold the rest of the way.