Like most DIY jobs, caulking requires some preparation, and will go smoothly if you have everything you need at hand before starting the job. Most of the tools you need can be found around the house; although there are specialty tools you can purchase if you’d like.
Tools
Required tools: clean surface, caulk, caulk gun (if required; see below), cutting tool (utility knife, knife or heavy scissors) alcohol or other solvent, damp shop cloth or paper towels, dry paper towels, short fingernails, and a steady hand. Optional: a caulking “tool” – a plastic device with beveled flattened corners that helps to create a uniform look and minimizes waste.
Identify Where to Caulk
First identify the surfaces to be caulked. For an older sink, you want to caulk any areas that will allow water to seep from the sink onto another surface. Typically, this is only the outer edge of the sink and around the faucet. If you are installing a new sink, you can run a bead of caulk under the outside edge before flipping the sink over onto the counter and under all new sink drain caps. Newer faucets sometimes have a gasket that is installed directly below the faucet plate, so no caulk is needed.
Your local plumber may tell you not to use caulk for securing the sink, faucet or drain caps. Plumbers generally use a product called plumber’s putty for these jobs. Plumber’s putty contains oil, and does not ever fully dry – which means it is ready immediately on all jobs. Caulk requires drying time. The downside to plumber’s putty is that it can erode over time if too much was used, creating an opportunity for leaks. It can also discolor some sinks because of the oil content. You may want to read the manufacturer’s instructions that came with your sink to see if plumber’s putty is discouraged. Which is better, putty or caulk? That question has yet to be satisfactorily answered. Either material will do the job for securing the sink and the drains, but caulk should be used to seal the outside edges of your sink.
Clean the Surface
Once you know which areas to caulk, you must clean the surfaces thoroughly. For a new sink, you can just spray an all purpose liquid cleaner and wipe the sink portion clean. If you are re-caulking the sink, you will need to remove any old caulk and be sure to clean the area very well. The counters should be cleaned and dried thoroughly. If the surface to be caulked is not clean, the caulk will not adhere well to the surface. If the caulk does not adhere well, it will peel off quickly and allow water to seep in, causing potential damage to counters, floors and cabinets.
Caulk the Seams
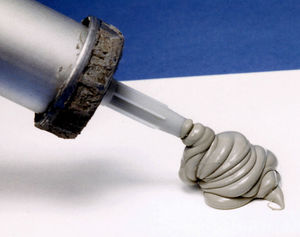
You must choose caulk that is rated for kitchens or bathrooms. It is generally considered best to use a solvent based caulk, since water based ones will erode more quickly in the wet environment. Water based caulks are available for kitchens and baths however. You can purchase caulk in a tube, or canister. Those in a canister require a caulking gun. Cut the end of the caulk container at approximately a 45 degree angle. If you have never used caulk before, it is always best to practice first in order to get a feel for how to slowly and evenly apply a “bead” of caulk. Try it out on a paper towel first. As you squeeze the gun or tube, aim for a line size that is equal to the tip. If you move too quickly, you will have a very thin line, and will not get adequate coverage. Too slow and it will bulk up, looking like you’re attempting a decorative cake edge. You should hold the gun at about a 45 degree angle and don’t press it hard into the edge, just “glide” it across the surface. You want the caulk line to look similar to the icing used to write a message on a cake.
Smooth the Caulk
You don’t need to get a perfect line, as your next step is to smooth out the caulk. If you purchased a tool, this is the time to use it. If not, you can use the tip of your finger. It helps if your nails are short, that way you can use your fingertip instead of fingernail.
Starting at the corner or edge, run your finger or tool along the edge at much the same angle as the caulking gun. You may want to dip your finger into water or the solvent before doing this to help keep it from sticking to your finger and pulling too much up. You don’t need to apply a lot of pressure – you are just smoothing the material to make sure it touches both sides of the surface you are sealing. As you pull your finger along the edge, you may need to stop occasionally and wipe excess caulk from your finger or tool onto the damp paper towel. If you do not clean the excess caulk regularly, you will begin to get it all over the place… so stop for a clean up when you need to.
Challenges and Mistakes
Your goal is to get as even a line of caulk as possible, but as long as it adequately covers the crack between surfaces, you don’t have to worry about it being perfect. If you completely mess up and end up with a tiny bit of caulk that barely covers the surface, don’t fret. You can simply start over – and you don’t even need to clean out the new caulk. Just put a new bead over the still moist caulk and smooth it out again.
If you are installing a new sink, and choose to put caulk under the sink edge, consider getting a second person to help you flip the sink over. This will help keep the caulk in the areas it is intended. You can also put a piece of scrap lumber or other spacer to help you set the sink down without pinching your fingers. Be sure to press the sink down thoroughly to make sure the caulk has created a good seal.
When caulking an area, it is better to have too much than not enough, as the point of the caulk is to prevent moisture from seeping through, so adequate coverage is essential. You don’t want clumps of caulk all over your counters though, so take your time and practice if needed.
Drying Time
Finally, let the caulk dry as directed on the tube. Don’t rush this! If you are having damp or rainy weather, you may want to give it a little extra drying time. If you get the caulk wet before it has dried completely, it may end up cracking or peeling away from the surface, and you will have to start again from scratch – after you’ve cleaned out the caulk you just installed. Take your time and you’ll love the results.