Materials:
You need about a half a yard of fleece or other non-raveling material (plenty for newborn size; may need more for much larger sizes) and a zipper — 18″ or so is a good length.
Step One:
Determine your pattern. You can either trace an existing wearable blanket, or draw “freehand.” (Tissue paper sold in the giftwrap aisle is an easy and inexpensive source of paper large enough to draw a pattern on, and has the additional benefits of folding up nice and neat for storage, as well as letting you see through to the fabric underneath so you can line up prints as you wish.) It’s the easiest by far to trace a blanket you already have (make sure to add a good half-inch for seam allowance all the way around, and an extra inch at the shoulders).
Step Two:
Fleece shrinks very little, so it shouldn’t be necessary to prewash. Lay the fleece out, still folded in half as it came off the bolt (i.e., the “wrong” sides of the fabric should be together). Transfer your pattern to the fabric, aligning the bottom of the pattern to the fold. I find it easiest to have a big permanent marker and trace around the edge of the pattern, but you may prefer to pin the pattern itself onto the fleece. Cut out the pattern, leaving the fold at the bottom whole. Do not cut a slit for the zipper.
Step Three:
Once the blanket is completely cut out, open it up and pin the zipper, “right” side down, to the “wrong” side of the fabric. (So you are looking at the wrong side of the zipper AND the wrong side of the fabric.) You want the top of the zipper (where the little metal stops are) to be right at the top edge of the blanket’s neck, and be careful to center the rest of the zipper onto the fabric, pinning at the bottom and at 2-3 additional points.
Step Four:
Unzip the zipper about four inches, then place additional pins to hold the now-unzipped portion in place. (This is not necessary if you are hand-sewing.)
Step Five:
Make sure you are only dealing with one layer of fleece! The “back” of the blanket is not involved in these next few steps. Sew down the right-hand side of the zipper, staying close to the edge of the zipper. Once you get almost to the zipper pull (i.e., have sewn about 3½ inches), stop sewing and put the needle in the down position. Raise the foot.
Step Six:
Carefully push the zipper pull back up to the top. This requires some wiggling and maybe a little bit of stretching, but by pushing from the bottom of the pull and tugging on the top, you should be able to get it past your machine foot unless you’ve been sewing too close to the center of the zipper. (If that happens, unzip the zipper a little farther, and sew a few more stitches, this time sewing closer to the zipper edge so you have more room to get it past.)
Step Seven:
Continue down until the point you wish for your zipper to “end,” being careful not to stretch the fleece as you sew. Put the needle down, turn the entire blanket 90 degrees and sew across the zipper. (I backstitch and forward stitch a few times across the entire zipper to add strength.) Turn again, and sew up the other side of the zipper (towards the top). When you get four inches or so from the neck, put your needle down, lift the foot, and again unzip the zipper past the foot. Sew up the rest of the way. The hardest part is done! Zip the zipper back to the top.
Step Eight:
Now, flip the fabric over so it’s right-side up. You should see two lines of stitching where the zipper should be. Slide your scissors between those two lines of stitching and between the fleece and the zipper, and cut the fleece (not the zipper!) open all the way down the length of the zipper, leaving a small allowance at the very end. It’s important to cut down the center of those lines, or your zipper may look funny or even get caught in the fleece.
Step Nine:
Now fold the blanket so that the right sides of the fabric are together. Carefully line up the sides and arm holes, and sew up one side from the fold to the beginning of the arm hole, taking care not to stretch the fleece. It should not be necessary to use pins; the fleece generally holds together pretty well. Repeat the process on the other side. This and the next step are good points to use a serger/overlock machine, if you have one.
Step Ten:
Finally, line up and sew across the tops of the shoulders.
Step Eleven:
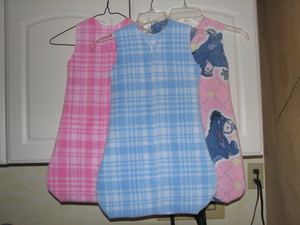
Turn the garment right side: voila! A finished, inexpensive wearable blanket.
Step Twelve — OPTIONAL:
You can help reduce a potential source of skin irritation by adding a zipper cover flap. Just cut a small piece of leftover fleece, about 2½ inches by 1 inch, and attach at the neck. You can use a snap, a piece of hook-and-loop tape, or even a button to tack it down, taking care to attach it well enough that baby can’t get it loose.