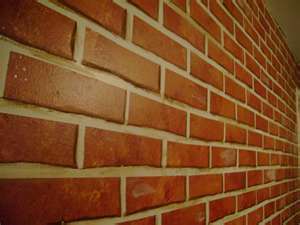
If you want to add a decorative look to a plain wall, or add a cozy textured feel anywhere in the home, give this faux brick paint technique a try. This unique process will provide the look of real brick without the back-breaking labor. Faux brick is a more advanced faux paint technique; if you have not tried it before, practice the procedure on a piece of scrap wood before actually applying it. Once you’ve mastered the technique, you’ll be ready to apply it to walls, floors, fireplaces, or even as a unique kitchen backsplash.
When choosing the colors for your faux brick, choose those that mimic its natural palette. You will be using a combination of three earth-tone colors, in addition to the cream base coat. Shades of sand, cream, brick red, gray, putty, and cream, are good colors to consider.
Supplies needed for faux brick:
– Base coat (cream latex paint)
– (3) colors of flat latex paint (options listed above)
– Glazing liquid (water based)
– (3) glass jars with lids
– Paint brush
– Thin painter’s tape
– Carpenter’s level
– Pencil
– Tape measurer
– Newspaper
Quick notes about faux brick:
– Using multiple colors will help add texture to your brick and give it an authentic look. This is why we recommend using three different shades, however, two can be used instead, if desired.
– The best thing about the faux brick paint technique is, they don’t have to look perfect. Real bricks are imperfect, so if each of the bricks you create is a bit different, that will only add to their beauty.
– Before painting the basecoat, make sure you prepare the walls properly. Learn how in this article ‘How to Paint a Room’.
Faux brick paint technique:
STEP 1 – Paint the area with the base coat. Again, if you are unsure how to properly paint a wall, consult the instructions for in the article ‘How to Paint a Room. Allow to dry overnight.
STEP 2 – Beginning your first faux brick evenly is essential. You MUST start off with a perfect straight line. If the first brick is uneven, the entire technique will be off. Thus, use a carpenter’s level to start marking the first brick. Use pencil (not pen!) to mark the brick pattern, and then go back and cover the marking with thin carpenter’s tape. Keep in mind, the thicker the tape, the thicker the ‘grout’ between the bricks will be. Continue until your entire brick pattern is complete.
STEP 3 – Mix each color of paint with glazing liquid in a glass jar. Follow mixing directions on the glaze packaging. Work in small, 2′ – 3′ sections at a time, and use a paintbrush to apply the different colors randomly in small 1″ – 2″ strokes. Allow the colors to overlap one another in some areas, and let the base coat show through in others. Imperfection is key!
STEP 4 – Now, to blend the colors together, fold a newspaper and press it flat against the painted surface. You can use cheesecloth or a sea sponge, if you prefer, but you’ll save money using newspaper. Press, don’t rub, the newspaper over and over the paint. Lift it, turn it, and move it all over to blend the colors together. When the newspaper gets very wet, toss it out and use a different sheet.
STEP 5 – Repeat this same process in small 2′ – 3′ sections until the entire surface is covered. Yes, the faux brick paint technique is time consuming, but it will yield beautiful results. Be patient, and take a break when your arm becomes tired.
STEP 6 – If you want to accent the brick even further, go back over and add a touch more glaze. Add a small amount to a sheet of folded newspaper and press it in different areas to add depth and dimension.
STEP 7 – Slowly remove the carpenter’s tape. As you lift it away, you’ll begin to see how rich this finished faux paint technique appears. The ‘grout’ lines will become visible, and give the faux brick an authentic look.
More DIY Faux Painting from Jennifer Wagner:
Aged Crackle Finish
Marbling
SOURCE:
Personal experience
Jennifer Wagner – Yahoo! Contributor Network