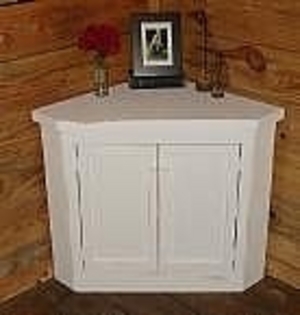
The room is full of furniture, and still more trinkets need display space. The picture- filled walls look wonderful, but the corners are bare. Eureka! The corners! The answer is simple: build a corner cabinet and hang in the space.
Corner cabinets have many uses in the home. There are corner medicine cabinets, corner lavatory cabinets for bathrooms, corner TV stand cabinets, corner china cabinets, and many more.
Building a corner cabinet takes a little more planning than a regular cabinet. Easily modify this project for a larger cabinet that can sit on the floor. If a larger cabinet is desired or if something will sit on the cabinet, upgrade the plywood to ¾-inch and the MDF to 3/8-inch or ½-inch plywood.
This project will make a cabinet that is 12-inches high and wide. Hung in the corner, it will allow for storage of objects. Although this has a single inside space, more shelving can be added later or when the project is built.
You will need:
• ½- inch furniture grade plywood
• ¾- inch, 3/8-inch and 1-inch #8 wood screws
• wood glue
• Bar clamps
• ¼- inch MDF for inside shelves
• 2 Corner clamps
• Measuring tape or ruler
• ½-inch cabinet hinges
• Molding, if desired
• Drill with countersink bits
• Picture hangers
• Appropriate hanger attachments for wall
Some things to keep in mind:
• Always operate hand or power tools with safety first.
• Wear the proper safety gear with any tool, glue, solvent, paint, etc.
• Never allow children to play around power tools when in operation.
• Know what will be stored in the cabinet before building it. Look at the fasteners used to hang the cabinet and do not exceed their weight allowance. Doing so will not only cause the cabinet to pull out from the wall and crash, but now you will have a drywall repair.
• When working with plywood and MDF, always pre-drill holes before inserting screws. This eliminates breaking the wood and having to start over or effect repairs.
Let’s begin with the basic carcass
Cut two boards of ½” plywood, one board measuring 12- inches square and the other, 12- inches by 12 ½- inches.
Place the boards in the corner clamps with the 12- inch square board butted up against the 12 ½- inch side. This ensures both sides of the cabinet are even.
Attach with four evenly placed one-inch screws through the long side of the board into the short board.
For the top and bottom
Measure both sides of the cabinet from front to back and across the front. Do this on both the top and bottom. Mark the MDF accordingly and cut carefully. Attach with 3/8-inch screws.
Prepare to hang
Attach the picture hangers to the back of the cabinet on each side. Mark and attach the appropriate hangers in the wall and hang the cabinet. If unsure what hangers are needed, speak to a representative at the local DIY store. Let the representative know if the wall is drywall, the cabinet will be attached to studs, plaster wall, paneling, etc. Each requires a different type of fastener system.
Dress it up
By measuring across the front, a frame can be created with molding and a door can be designed and hung, enclosing the cabinet. Try a glass or plastic door for a see-through effect.
Moldings can dress up any cabinetry. Sold by the foot or inch, look for clearance stock for small projects, or perhaps check with a woodworking friend who might trade scraps for something.
Match the molding to other furniture in the room and give the appearance of having a set.
Fill the countersunk holes with wood putty or wood plugs, then finish with stain, paint or leave plain.
Be careful not to overload the cabinet or the hanger’s capacity.
A taller corner cabinet can be built and placed on top of an existing floor-based corner cabinet. Or, place two corner cabinets on either side of a taller shelving unit set on a bureau or entertainment stand. Secure in place.