Both the dealer service manual and the applicable Chilton guide make removing and replacing the starter on the Daewoo Nubira sound simple: remove the wires, unbolt the old one, bolt the new one on, replace the wires, and you’re done.
What they’re not so clear on is where the starter is located: above the transaxle, and underneath the intake manifold. If one knows it’s there, it can be seen–barely–with everything else left intact. To remove it without removing the intake manifold (or taking the engine out of the car) is nearly impossible. You will have to remove the intake manifold to remove your Nubira’s starter. Moreover, you will have to remove the throttle body to properly torque the intake manifold retaining nuts when putting everything back together. Prepare for this by ordering an intake manifold gasket and a throttle body gasket from Daewoo; even if your starter has not yet failed, add these gaskets to your next parts order so you are not waiting a week to perform a repair that can be done in a night. A remanufactured starter can be had from AutoZone and other auto parts chains and stores. Even if only the starter solenoid fails, I recommend replacing the starter as a unit, because the starter on a high-mileage car is bound to fail, and this repair is such a hassle.
In addition to the gaskets and standard auto repair tools (sockets, screwdrivers, ratchets, a torque wrench), you will also need deep sockets, specifically in the 10 mm and 14 mm size. I also recommend using anti-seize compound on all threads for which it would be sensible. When replacing my alternator, I had previously used it on the bolts holding the intake manifold to alternator support bracket to the intake manifold and the engine block. It made disassembly for this job much easier.
To replace your Nubira’s starter:
- Raise and support the vehicle, on ramps or jackstands.
- Remove the driver’s side front splash guard.
- Drain the coolant.
- Remove the negative battery cable. You will be disconnecting, among other things, the ECM ground wire, so don’t skip this step.
- Remove the air intake tube and resonator as an assembly, and the air cleaner as an assembly, disconnecting the necessary electrical connectors. You will have to disconnect quite a few of these as you go. If you have difficulty keeping track of what plugs in where, label everything with masking-tape flags.
- Remove the serpentine belt from the alternator. Use an extension bar to relax the tensioner to facilitate this.
- Remove the two alternator support straps from the intake manifold, engine, and alternator.
- Remove the throttle cable from the throttle body.
- Remove the coolant hoses and vacuum lines from the throttle body and disconnect its electrical connectors. Again, flag anything you may get confused by later.
- Remove the throttle body as a unit.
- Depressurize the fuel system and disconnect the fuel lines from the fuel rail.
- Remove the fuel rail by disconnecting the two snap-in electrical connectors from the bottom, removing the fuel rail retaining bolts, and pulling the rail and injectors out of the cylinder head as a unit. There is no need to open the cover or trace the rather large wiring harness back to its source at the ECM and remove it. Just protect the injectors with a clean rag and a plastic bag and set the assembly aside where the air cleaner usually sits. If any of the injectors stay in the head, purchase new injector o-rings and retaining clips at your local auto parts store and remedy this before reassembly.
- Remove the ground wires and the brake booster vacuum line from the intake manifold.
- Remove the evaporative emissions purge valve and its bracket from the intake manifold, as a unit. This sits on the driver’s-side end of the intake and is held into place by an M7 bolt.
- Remove the wiring harness clamp from the bottom of the intake manifold. I had to climb on top of my engine to do this, a practice which I do not recommend. You may be able to remove it from the underside of the engine. If not, prepare to get cozy with your Holden-built two-liter four-banger.
- Remove the intake manifold support bracket bolt. This is the larger bolt sitting next to the wiring harness clamp, and is also very difficult to access.
- Remove the intake manifold bolt, the several intake manifold nuts, and the intake manifold. If you’re having trouble keeping track of fasteners by this point, put them into jars, zipper bags, or a tackle box, with descriptive labels.
- Remove the throttle body gasket and intake manifold gasket from the intake, and discard. Clean the mating surfaces.
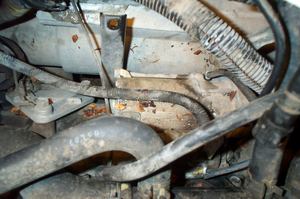
- By this point you should be able to see the starter, but several coolant hoses and a black coolant pipe, bolted to the block, will be in your way. Remove these and set aside.
- Disconnect all electrical connections at the starter.
- Remove the starter. One of its mounting bolts can be found on the bellhousing side and mates with a threaded portion of the starter housing. The other doubles as an electrical connection lug and can be found lower and on the opposite side; this is where you will need the 14mm deep socket.
- Mount the new starter and reconnect its electrical connectors. The specification for the mounting connections is 45 Newton-meters for the starter-to-engine bolt and 50 Newton-meters for the starter-to-transaxle bolt. This is out of range of my torque wrench, so I just made the connections good and tight.
- Re-attach the coolant pipe to the engine block and reassemble its associated coolant lines.
- Ensure that the mating surface is clean and place a new intake manifold gasket on the engine.
- Replace the intake manifold on the engine. Put the intake manifold bolt and the several intake manifold nuts into place, but do not tighten.
- Tighten the intake manifold nuts and the bolt to 22 Newton-meters, in an inside-outside pattern, that is to say, start with the two innermost nuts and work your way outward to the outermost nut and the bolt, alternating sides as you go.
- Replace the intake manifold support bracket bolt, through the support bracket, into the intake manifold. This is difficult to do due to the layout. Just have patience. If you can get a torque wrench into that part of the engine compartment, torque the bolt to 20 Newton-meters as specified by the manual. Otherwise, just make it finger-tight.
- Re-attach the wiring harness clamp next to the support bracket bolt.
- Replace the purge valve assembly and the brake booster vacuum line onto the intake manifold.
- Re-attach the ground wires to the top of the intake manifold.
- Put the fuel rail assembly back into the cylinder head and tighten the retaining bolts to 10 Newton-meters. Reconnect the associated electrical connectors. (The crankshaft position sensor plugs in here; if you forget to plug it back in, there will be no spark!)
- Reconnect the fuel lines.
- Replace the alternator support brackets onto the manifold, alternator, and block. Tighten the bolts to 20 Newton-meters.
- Replace the serpentine drive belt.
- Install a new throttle body gasket and replace the throttle body on the intake manifold. Tighten to 20 Newton-meters.
- Replace all vacuum and coolant lines and electrical connectors on the throttle body. Replace the throttle cable to the throttle body.
- Replace the air intake tube and air cleaner to their respective locations and re-connect the associated sensors.
- Reconnect the negative battery cable.
- Flush the cooling system with distilled water in the usual way, then fill with a 50-50 mix of Dex-Cool (orange) antifreeze and distilled water
- Replace the driver’s side splash guard on the vehicle.
- Lower the vehicle.


