Cutting ceramic tile is not a difficult skill to master but, without some easy to follow guidelines, working your way around a bathroom fixture could convince you otherwise. Nearly every tiling job requires trimming tiles to fit around borders or obstructions, such as window frames, electrical fixtures, pipes, basins, toilets, or countertops.
Straight cuts are simple. If you only have one or two tiles to cut, you can use a glasscutter and a wooden dowel or a simple handheld tile snapper. However, if you will be doing a large tile installation project that requires cutting many tiles, use a masons tile cutter. The suppliers generally rent or loan them to customers. The time you save and the accuracy you gain with this relatively foolproof professional tool will justify a small rental fee.
Shaping tiles to fit curves is slightly more difficult; it takes practice and patience. Cut a template from thin cardboard to the exact shape of the finished tile. Transfer the shape to the face of the tile using a pencil to make a score line.
You can cut shapes and curves by scribing the tile along the score line with a glasscutter and nibbling away the waste with a tile nipper. However, an easier and often faster method is to cut the complex shape with a tungsten carbide rod – a thin wire covered with abrasive particles – fitted in a hacksaw frame.
If a pipe or fixture falls at the edge of a tile, that section can be cut or nibbled away. When the obstruction will protrude through the middle of a tile, you can choose between two methods. With the first, mark a shape, then drill the hole with an electric drill and carbide masonry bit. Then, insert a tungsten carbide rod blade into the hole, attach it to a hacksaw and finish the cut.
If the tile cannot be slipped over an obstruction, split it at the centerline of the object and carefully saw or nibble away the two sections of tile to fit.
Take extra time to practice cutting techniques beforehand. Then when it comes to cutting the tiles that count, you will work with the confidence of a pro. Always wear safety glasses when working with tiles to protect your eyes from flying ceramic chips.
You will need:
Mason’s tile cutter
Wooden dowel
Tile snapper
Combination Square
Hacksaw with tungsten carbide rod blade
Glasscutter
Pencil
Round file
Safety glasses
Aluminum oxide sandpaper
Pliers
Electric drill equipped with ½ inch carbide masonry bit
Tiles
Household oil
Splitting tiles
Scribing the tile. Measure and mark the cutting line. Lubricate the wheel of a glasscutter with household oil. Apply firm pressure on the glasscutter and scribe the tile with only one stroke. Use a combination square as a guide.
Using a tile snapper. Center the cutting blade on the scribed line and exert pressure by squeezing the handles together. Use your free hand to hold the side of the tile you will be cutting.
Snapping tiles by hand. With the scribed line up, position the tile over a thin wooden dowel or pencil. Lay your fingers flat on either side of the tile and apply firm, even pressure until the tile snaps.
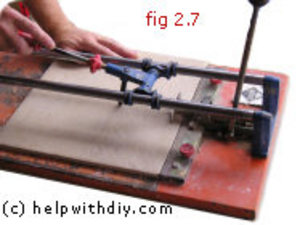
Using a mason’s tile cutter
Draw a line on the tile to indicate where it should be split. Align this mark with the cutting guide on the tile cutter.
Support the tile to keep it level. Lower the cutting wheel onto the edge of the tile and push it away from you with firm pressure.