Are you looking to create a custom look for your front lawn for the holidays? If so, you may want to consider creating a series of holiday decorations with plywood and paint. It is a tradition that my parents started when I was just a year old. Each year, they would add more plywood figures to their holiday displays. As such, I eventually learned how to make the decorations too. It is not hard to do. Here’s how:
Supplies Needed
In order to make holiday lawn decorations, you’ll need sheets of pressure treated plywood, galvanized wood screws, a power drill and wooden stakes (pressure treated). You may make the decorations as large or as small as you wish. Therefore, the amount and size of plywood needed will depend on your own personal preferences. My family liked making life-sized decorations. As such, we used one large sheet of plywood and one stake per decoration. You’ll also need an assortment of paint, primer, paintbrushes and a waterproof wood sealant.
Creating the Design
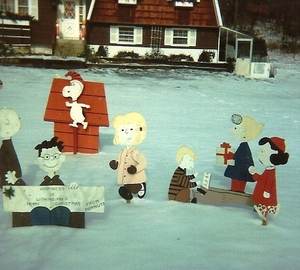
When I was growing up, my father would typically get his design ideas from children’s coloring books. He would then draw his version of the characters, in pencil, onto plywood sheets without the aid of a stencil. As such, our holiday decorations primarily consisted of figures like Snoopy, the Grinch, Rudolph the Red Nose Reindeer, Frosty the Snowman and elves. He also made plywood Christmas trees and wreaths that he would decorate further with strings of holiday lights.
If you are not comfortable with drawing your holiday designs freehand, you could opt to transfer a design onto the plywood. It is easy enough to do. In order to transfer a design onto the plywood, you’ll need a children’s coloring book, a pencil and an overhead projector. Begin the transfer process by finding a design that you like and tear it out of the coloring book. Next, place the coloring sheet onto the overhead projector. Then turn the overhead projector on and focus its light onto the plywood sheet. Doing so should cause the design to appear on the plywood. Afterward, using the overhead outline as a guide, trace the design in pencil.
Continue by coating your plywood decoration with two coats of primer. Let the primer dry and then start filling in your design with paint. Because your lawn decorations will be exposed to the winter elements, I’d suggest that you use several coats of paint. You’ll also want to generously coat the finished design with a high quality, waterproof sealant. Once that’s done, allow the sealant to dry before attempting to install your decorations.
Installing the Decorations
Proceed by deciding where you want to place your holiday figures. Then install wooden ground stakes in those locations. Once the wooden stakes are in place, attach the plywood figures to them with wood screws and a power drill. If you live in an area that is prone to windy weather, make sure that you use three or four screws per figurine. Otherwise, strong winds may cause the figurine to detach from the wooden stake.
Source: Personal Experience
More from this contributor:
Green Gift Ideas: How to Make a Leaf Print Canvas Tote with Real Leaves
Travel Insurance: Know the Risks Before Your Buy
Top 5 Ways to Visually Signal for Help When Hiking