When it was time to celebrate our son’s first birthday, we knew instantly that the party theme would be Mickey Mouse. Our son is enthralled with anything Mickey Mouse, and so about a month before his birthday I set out to find the perfect Mickey Mouse cake for the occasion. Unfortunately, the task was not as easy as I hoped it would be. In fact, we visited our local Publix supermarket and discovered that, due to copyright and trademark laws, they only had one Mickey design to offer. While it was a nice cake, it was not quite right for our son’s first birthday, so the search continued with the same result. Finally, I did what any zealous new mom would do– I took to the internet and “Googled” Mickey Mouse cakes, scouring through hundreds of cake pictures so that I could make the cake myself! Still, I couldn’t find that one design that was just right. One day my husband showed me a picture of a beautiful 3-tier cake that a private cake designer – who lived 50 miles away – offered for $65. After emailing back and forth with the cake maker and discovering she wasn’t available to make his cake anyway, I finally came to one conclusion: “I can make that!” Here’s how to make this 3-tier Mickey Mouse cake.
Frosting
I have never been a fan of fondant, so that was one change from the original cake that I decided to make. Instead of fondant, I used buttercream frosting. However, I knew the red tier and the black tier were going to require a lot of food coloring to achieve the right shades for Mickey, which would result in a very bitter food-coloring taste, so I started out with strawberry frosting for the red tier and chocolate buttercream for the black tier. The chocolate only needed a little black coloring, while the red still needed almost an entire container of coloring, but by using flavored frosting as a base, the finished product was very tasty with no bitterness. For the yellow tier, I used regular buttercream and about a quarter of a container of yellow food coloring.
*Tip: Prepare the colored frostings a couple of days in advance then seal them in an airtight container and refrigerate them. Doing so will naturally deepen the color, so less coloring is needed. This also thickens the frosting for easier spreading.
Making the Cake
The night before my son’s birthday I baked all of the cake layers for each tier, and then I wrapped them in plastic wrap and aluminum foil and froze them overnight. This trick I learned from a Publix baker. Freezing the cake layers makes them much easier to frost, prevents all the crumbs from getting into the frosting, and, apparently, all professional bakeries do this.
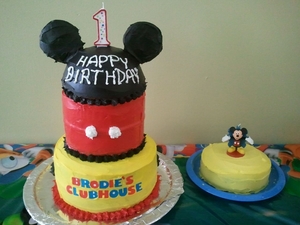
I used store-bought confetti cake mix for the red and yellow tiers and chocolate cake mix for Mickey’s black head/hat tier.
The yellow tier was made using two Wilton’s 8-inch cake pans. The red tier was made using two Wilton’s 6-inch cake pans, and the top tier, Mickey’s hat, was achieved by using a small Pyrex glass baking bowl. Mickey’s ears were made with two homemade chocolate chip cookies! Just before they were finished baking, I inserted a toothpick into one end about half-way down the pick.
*Tip: Bake until almost crispy for easier frosting.
Use two cups of cake mix for each pan, and fill the Pyrex bowl approximately half-full.
As soon as the cakes come out of the oven, you’ll want to “level” the cake. This can easily be done by placing a small towel over the top and pressing firmly and evenly down onto the cake with your hands. Once cool, cover and freeze until ready to frost.
Assembly
A few hours before your event, remove one tier at a time to frost. You do not want the layers to thaw before being frosted; otherwise, it will be more difficult to manage. Place the bottom layer of each tier on a cake board – I trimmed each board to be just slightly smaller than the cake layer so that the board would stay hidden. Frost each layer by putting an ample amount of frosting in the center and spread towards the edge and over the sides using one long, fluid stroke.
*Tip: For smoother, shinier frosting, keep a large container or cup of hot water nearby and dip your spatula or knife in after every stroke, then wipe clean before spreading again. This will result in that extra smooth fondant-looking finish.
After the bottom tier is assembled and frosted, add three to four dowel rods, evenly spaced, into the center of the 2-layer tier. These should be the height of both layers stacked on top of each other without sticking up too much.
Next, repeat the frosting process with the red 2-layer tier and then gently place on top of the bottom tier. Finally, place the bowl-shaped tier upside-down on a cake board and frost with the black frosting. Frost the cookies and insert into the chocolate cake to form Mickey’s head/hat. Again, dip the spatula or knife in hot water in between strokes to achieve a super smooth and shiny look. Last, place Mickey’s head/hat on top of the red tier.
Finishing Touches
Use red frosting to create a dot border around the bottom of the cake. Use black frosting to create a dot border at the bottom and top of the red tier. Use plain white icing (thick consistency) to create Mickey’s pant buttons.
Rather than rely on my shaky hand, I used sugar sheet letters to write out, “Brodie’s Clubhouse.
Finally, I added a one-layer 6-inch smash cake, decorated only with yellow frosting and a Mickey Mouse candle/figurine, for our son to eat.
*Tip: This cake will be very heavy, so if you don’t have help moving it, you may want to frost and assemble it where it will be displayed.
Success!
Though this was a three-day process, and I was a ball of nerves (because my perfectionist personality wanted it to turn out perfectly), I am so happy I made this cake myself. I learned that making a beautiful gourmet cake is not just for professionals and is easier than what I thought it would be. In the end, we saved money, had an amazing cake for our 30+ guests, and, the best part, it was made with love!
Source: Personal Experience


